Cookie
How to Decorate Cookies Like a Pro Baker
Everything you ever wanted to know about making picture-perfect cookies.

We should all have a solid command of the ABCs of baking. Thankfully, Food52's Resident Baking BFF Erin McDowell—alongside photographer Sarah Stone, who both blog at The Shutter Oven—is here, with tips and tricks to help you master the most essential desserts and the simplest breads.
Today: Don't suffer through holiday cookies that taste like cardboard. You (and Santa) deserve better.
What's my number one holiday pet peeve? Cookies that taste like cardboard. Or worse, cardboard cookies with no decorations at all.
Don’t get me wrong: I’m a sucker for all things adorably decorated, and roll-out cookies are no exception. But just because they're often used solely as a vessel for icing doesn't mean that the cookie itself shouldn't be delicious. Start with a stellar sugar cookie recipe and then go from there. My favorite way to decorate sugar cookies—especially for holidays and special occasions—is by using royal icing. The secret to getting precise lines, dots, and other details with royal icing is using a squeeze bottle. But I’m getting ahead of myself.
Once you find a good recipe, the techniques for prepping and baking are quite simple. As far as decorations go, the sky is the limit, but I’ve got a few (simple) ideas that look good and taste great, too. Here’s how to make sugar cookies so good, you might forget about the icing:
How to Bake Sugar Cookies
Before I talk about decorating tips, I want to share a few of my tried-and-true techniques for baking a batch of sugar cookies that you’ll actually want to eat, not just ice.
The Butter
Cream, cream, cream, cream the butter. Sugar cookies contain so few ingredients that a surefire way to mess them up is during mixing. Some recipes for roll-out sugar cookies might tell you to use a different technique, but I like to use the creaming method for mine. Start by mixing the butter and sugar together. Every recipe in the world will tell you to mix “until light and fluffy," but what does this mean? During the process of creaming, you’re incorporating air into the mixture, while also combining the butter and sugar. The whole process actually helps to “dissolve” the sugar into the butter, which makes for a properly mixed cookie. This process—done correctly—takes 4 to 5 minutes on medium-low speed.
Adding Flavor
Don’t be afraid of over-mixing here—that doesn’t become a problem until the flour is added. If you’re adding flavors like citrus zest or vanilla bean, add those at this point, too; the process of creaming will help to release essential (flavorful) oils and combine those flavors more fully into the finished dough. You'll add the eggs next, and with them, any liquid flavorings like extracts. Add your egg(s) one at a time, as soon as the creaming process is finished, mixing on medium speed to combine. Scrape down the bowl and the batter well after adding the eggs—they are a primary leavener and are also crucial for texture and moisture content—and make sure they are mixed in evenly. You want to make sure everything is properly combined before you add the flour, because that’s when things get trickier.
The Dry Ingredients
Careful with that flour: Once flour becomes involved, the process requires more precision. You want to take great care not to over-mix your dough; otherwise, your cookies will be unpleasantly crisp (rather than chewy) and tough (rather than soft and buttery). Sift or whisk together your dry ingredients (flour, chemical leavener, salt, and any powdered spices) to combine them. Combining these ingredients beforehand makes sure that they have the best chance of being properly incorporated, which can help to reduce mixing time overall.
Add the flour all at once (unless your mixer physically can’t handle that), and pulse the mixer a few times to avoid a floury cloud from poofing up out of the mixing bowl. Mix on low speed just until the flour is incorporated, scraping down the bowl as necessary. As with any kind of wheat flour-based baked good, the dough can begin to develop too much gluten if mixed for too long, which will make it tough (this also makes it harder to roll and can lead to cookie shrinkage in the oven).
Something Sweeter
Like chocolate? Me too: Most sugar cookie recipes can be made into chocolate cookies by reducing the flour and subbing in cocoa powder. A good jumping off point is to reduce the flour by 1/4 cup and add 1/4 cup of cocoa powder. For a more intense cocoa flavor (or for a larger batch of cookies), consider increasing it to 1/3 or 1/2 cup. The fat in the cocoa powder has a delicious effect on the dough: It makes the cookies taste almost like thin, chewy brownies. Yum.
Chill Out
Cookie dough needs to be cool when you roll it. Press it into a disc about one inch thick, wrap it in plastic wrap, and chill for at least one hour, and up to overnight. For one thing, this makes the dough easier to roll—room temperature butter just sticks to your work surface, which means you have to add more flour. This, in turn, makes the dough tougher, because that excess flour gets incorporated into the dough.
It also gives the dough time to relax. The protein strands that developed during mixing relax under refrigeration, which means that the dough is less likely to shrink when it is rolled, cut, and baked. Also, if you’re using a complicated cookie cutter shape (with lots of detailed nooks and crannies), the shape is more likely to hold up if the dough is cold. For this reason, I like to chill my cookies again after they have been cut. Just 5 to 10 minutes in the freezer (or 15 minutes in the refrigerator) is enough to prevent excess spreading.
Rolling Out the Dough
Don't use too much flour: If you hadn’t guessed, it’s important not to use too much flour when you roll out the dough. A light dusting to your surface and your rolling pin should do the trick. Plus, if you've rolled your soft dough into a 1 inch-thick disk, you don’t have very far to go to roll out the dough to the proper thickness. Apply gentle, even pressure, working from the center outwards to roll the dough to about 1/2-inch thick.
You can reroll the scraps of dough, but if you do, I’d suggest just doing it once, as the process makes the dough tough very fast. (You can always bake off the scraps without rerolling on a parchment-lined baking sheet, then grind the resulting messy cookies into cookie crumbs for the pie or cheesecake of your choice). For maximum yield, you can always just use a pizza cutter/pastry wheel to cut your cookies into squares—you'll have almost no leftover scraps!
Cutting the Cookies
Cut careful, cut close: Flour your cookie cutter lightly before cutting shapes. It’s best to cut similar shapes out of each roll-out of dough, for the sake of maximum yield. Cut very close together to reduce scraps. For odd shapes and sizes, twisting the cookie cutter sideways and/or upside down will often help to get the most out of your roll-out.
Time to Bake
Don’t bake until golden: So many recipes say to bake cookies until they are golden brown, but sugar cookies of this variety should still be very pale when you pull them from the oven. The best way to tell that they are done is that they are just beginning to brown around the edges—the top of the cookies will look pale, but they will be “set.”
How to Decorate Sugar Cookies
It probably goes without saying, but don’t try to decorate a baking sheet of freshly baked sugar cookies when they are even a teensy bit warm, or all of your careful frosting will be for naught. The warmth from the cookies will cause the royal icing to melt, cause colored sprinkles to bleed a rainbow of red and green, and make it impossible to create the Pinterest designs of your dreams. Let them sit at room temperature for at least 30 minutes so that they can fully chill. When the cookies feel cool to the touch...
...it's time to decorate! I have some fast, easy favorites for decorating cookies. They’re nothing fancy, but I’m always glad to have a few quick techniques up my sleeve for last-minute holiday cookie baking (which always happens)! Here are a few of my favorite ways to decorate different types of cookies:
Sandwich Cookies
Make a simple buttercream frosting (any flavor you like), and pipe it into the center of half of your cookies. You want to use enough frosting that it will fill the cookie, but not so much that it will ooze out when you press it. For a standard cookie size, I find leaving a 1/4-inch border around the cookie is perfect. Place another cookie on top and press gently until the frosting squishes out to the edges. Then, roll the edges of the cookie in crushed candy or sprinkles. I like to use chocolate sugar cookies and peppermint candies for this.
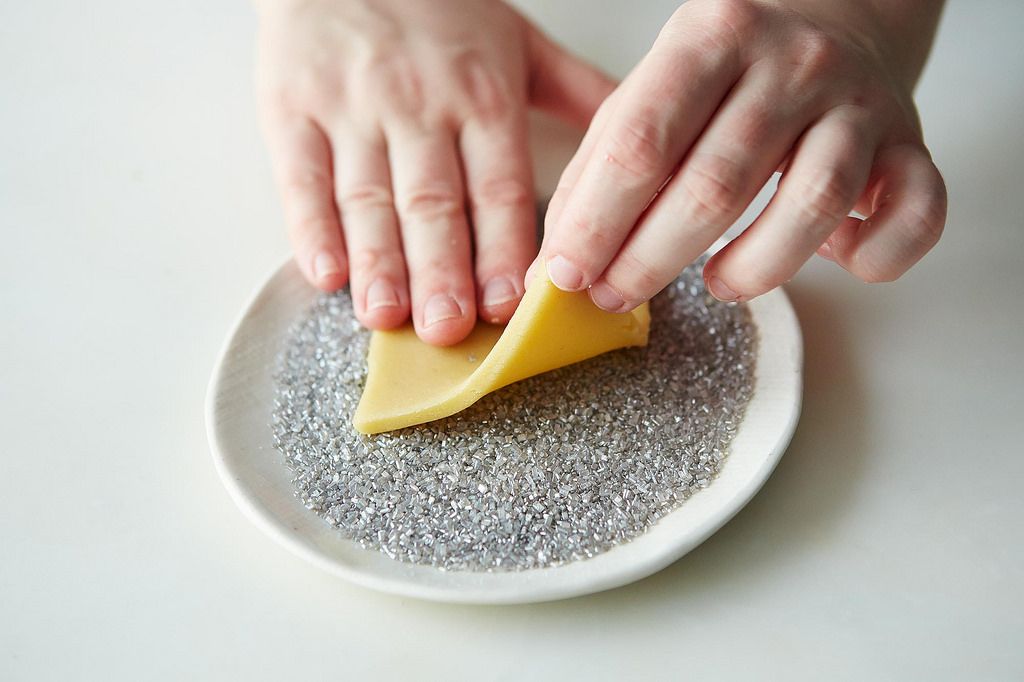
Pre-Bake Sprinkle Time
Pour some sprinkles onto a plate and shake the plate gently to make an even layer. Place a piece of cut-out sugar cookie dough face-down into the sprinkles. Press gently with your hand to help the sprinkles adhere to the dough, then gently transfer the cookie to a baking sheet. The sprinkles may not stick super well prior to baking, but they’ll be nicely attached by the time the cookies come out of the oven.
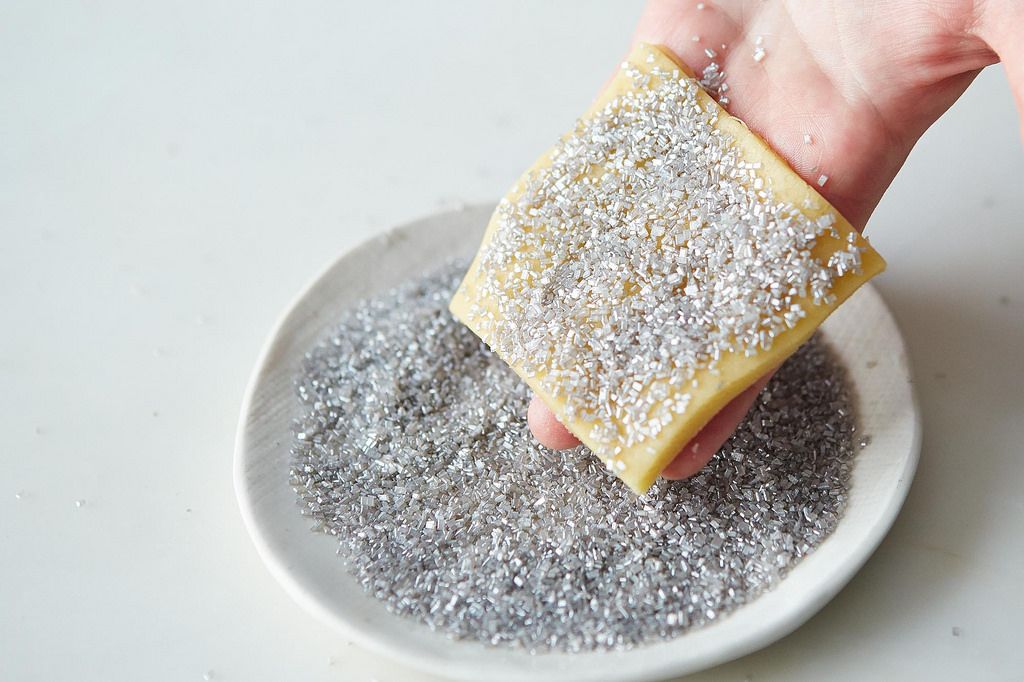
Post-Bake Sprinkle Time
Or you can dip the cookies in sprinkles after you bake: This is my favorite way to decorate cookies when I want to use something more flavorful than royal icing—and keep the effort minimal. For this, I usually make a simple icing out of powdered sugar, heavy cream, and vanilla (like what you might use to frost cinnamon rolls). It needs to be thick enough to adhere to the cookie without dripping off, but thin enough to be spreadable. A good ratio is 2 cups powdered sugar to about a 1/3 cup heavy cream.
Place the cookie face-down into the icing, then lift it out (you’re dipping here). Use a spatula to even out the icing a little if it’s wonky, then place the cookie face-down into a plate of sprinkles. The sprinkles will adhere easily, but you can press gently to make sure you get an even coating (if the sprinkles are in a plate rather than a bowl, the flat surface of the bottom will also help to even out the frosting). Let these cookies set for at least 15 minutes before serving—the icing will set up to be relatively firm.
All About Royal Icing
Royal icing is the key to perfectly iced cookies. The secret ingredients are powdered sugar and meringue powder (or whipped pasteurized egg whites). That’s it! You could add a small amount of lemon juice for flavor that won’t disrupt the pure white color of the icing, but that’s your call. If you’re thinking beyond white icing, add food coloring based on the holiday season (think pastels for Easter or a dark-as-the-night-sky hue for Halloween cookies). Meringue powder sounds like a specialty ingredient, but because it’s such a staple in this essential icing recipe, it’s easy enough to find in most grocery stores or craft stores.
Make a batch of firm royal icing (I usually use Martha Stewart’s recipe). When I say firm, I mean firm enough to pipe through a squeeze bottle or piping bag, but it shouldn’t be so firm that you struggle to squeeze it out of the pastry bag. If it’s too thin, add more powdered sugar; if it’s too thick, add more egg whites or lemon juice. You need it thick enough to pipe lines. I use this technique when I want a pretty royal icing cookie but don’t have any fancy cookie cutters handy. I just cut circles out of cookie dough, then pipe lines to look like snowflakes on each cookie's surface. This is easier than it sounds—and since every snowflake is different, there's no need to be precise. A sprinkling of candy or sprinkles at the end adds sparkle and can help to cover up any mistakes.
If you want to fill the cookie entirely with royal icing, pipe an outline around the perimeter of the cookie and then flood icing in the middle. Use a toothpick or cake tester to fill in any gaps or air pockets. If you decorate with royal icing, know that it tends to set fast so work as quickly as you can while still paying careful attention to precision.
What are your favorite ways to decorate sugar cookies? Share your top tips in the comments below!

Choose your holiday adventure! Our Automagic Menu Maker is here to help.
View MakerWritten by: Erin Jeanne McDowell
Popular on Food52
4 Comments
Oh no! I've never made this recipe with shortening, but I don't think it should drastically effect the end result. This is my regular recipe, but I'll make it again tomorrow and post results here for you in case you want to try again. In the mean time, if you're looking for another option, try this one: https://food52.com/recipes/19858-holiday-cut-out-cookies
See what other Food52 readers are saying.