It's always more fun to DIY. Every week, we'll spare you a trip to the grocery store and show you how to make small batches of great foods at home.
Today: Kate Doran of The Little Loaf gets down and buttery with everyone's favorite pasta sidekick -- garlic bread. 
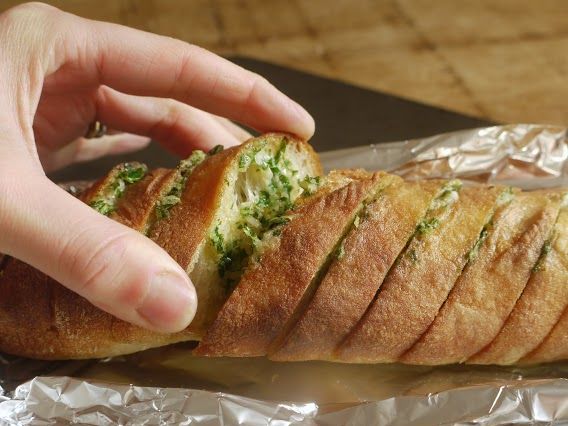
With a chewy center, crisp brown crust, and melting puddles of parsley-flecked butter, homemade garlic bread baguettes are worlds away from the anemic-looking loaves in the freezer aisle of your local supermarket. My mom used to make garlic bread as an after-school treat for my brother and me when we were little, and I can still remember the excitement of tearing open the tin foil parcels, trying not to burn our hands, and fighting each other for the very last piece.
While my mom always used baguettes from the local bakery, which is an option if you're short on time, baking the bread from scratch makes the entire process more satisfying.
More: What to know everything about the perfect loaf? Read on.
The combination of butter, garlic, and parsley is a tried and tested favorite, but feel free to experiment with different flavors: Consider substituting the parsley for coriander, or replaced with parsley and garlic with chiles and lime, or basil and Parmesan.
Classic Garlic Bread
Makes 2 baguettes
For the baguettes:
Canola oil, for greasing
250 grams bread flour
1 teaspoon active dry yeast
1 teaspoon salt
For the garlic butter:
12 tablespoons unsalted butter, room temperature
3 to 4 garlic cloves
3 tablespoons finely chopped parsley
Start by making the baguettes. Lightly oil a large bowl and set it aside. In a stand mixer fitted with a dough hook, add the flour, yeast, and salt. While mixing the dough at a slow speed, slowly add water, a 1/8 cup at a time, but do not exceed 3/4 cup, until the dough comes together. Turn the speed to medium and continue mixing for about 5 minutes, until you have a smooth, elastic dough.
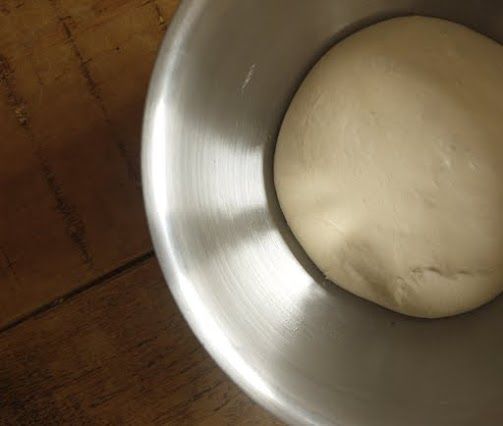
Shape the dough into a ball, transfer it to the oiled bowl, and cover the whole thing with a tea towel. Leave the dough until it has doubled in size, about 1 hour.
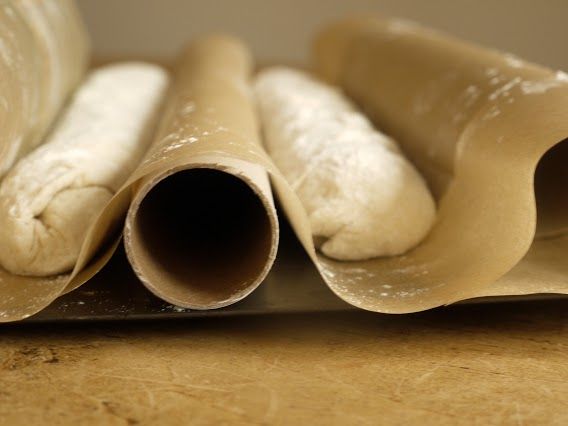
While the dough rises, make a makeshift baguette tray (or, if you already have one, flour it lightly). Find three paper towel holders (or roll up three kitchen towels) and place them equidistant on a baking sheet, then cover them with baking parchment. The two gaps between the rolls will form pockets to hold your dough as it rises, helping the baguettes keep their shape, as shown in the photo below.
Once your dough has doubled in size in the bowl, tip the dough onto a floured work surface and cut it into two equal-sized pieces. Try not to knock too much air out -- this is what will create those lovely air pockets in your baguette.
Gently flatten one piece of dough into an oblong shape and, starting at one end, fold one third into the center, then fold the other third so that they two ends meet in the middle without overlapping. Then, fold in half lengthwise, like a hot dog. Place the dough seam-side down and gently roll it out so that the ends taper slightly. Place it on the prepared baguette tray. Repeat with the second piece of dough.
Put the tray inside a clean plastic bag or plastic wrap to keep it warm and leave to proof for an hour. Meanwhile, heat your oven to 425° F.
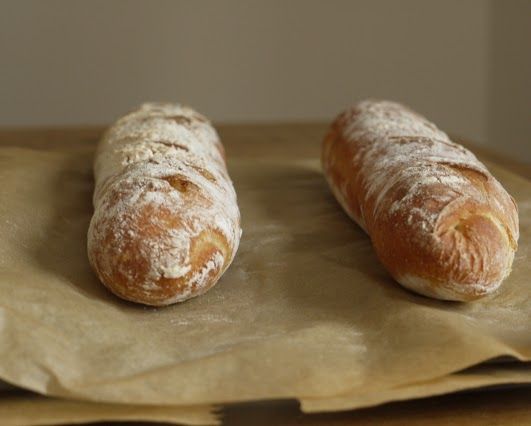
When the baguettes have doubled in size, remove the tray from the plastic bag, and, if using a makeshift tray, remove the rolls or tea towels, unless using a baguette tray. Score the tops with five diagonal cuts and bake for 20 minutes or until lightly golden -- you don't want too dark a color as you'll be baking them again with the garlic butter. Remove the bread from the oven and cool on a wire rack.

While the baguettes are baking, make your garlic butter. In a medium bowl, use a fork to mash together the butter and garlic. Stir in the parsley until well combined, then shape the mixture into a cylinder 1 to 1/2 inches in diameter. Wrap in cling film and refrigerate until ready to use.
When the baguettes are out of the oven and have cooled completely, use a serrated knife to cut incisions about an inch apart along the length of each baguette, making sure not to cut the whole way through.
Remove your garlic butter from the fridge, unwrap it, and cut it into thin slices. Wedge a slice between each slit in the bread, then loosely wrap each baguette in tin foil.
Bake for 10 to 15 minutes at 425º F, opening the foil for the last few minutes to crisp the top.
Enjoy it warm, or keep it wrapped in foil in a bread box for a later day. It will keep for about two days.
See the full recipe (and save and print it) here.
Photos by Kate Doran

A New Way to Dinner, co-authored by Food52's founders Amanda Hesser and Merrill Stubbs, is an indispensable playbook for stress-free meal-planning (hint: cook foundational dishes on the weekend and mix and match ‘em through the week).
Order nowWritten by: Kate Doran
Popular on Food52
6 Comments
Also, there is no temperature given for the water. I used warm, thinking my yeast would need warm if I was proofing it in water, but I keep peeking at my dough and it isn't doing anything after 45 minutes. I know my yeast is good because I tested some. Fingers crossed.
This reminds me so much of a garlic bread that was served in a restaurant where I worked as a teen. The bread was not site-made, it was a "brown and serve" french bread made by Pepperidge Farm, little individual loaves that we thawed, sliced and stuffed with garlic butter, and baked for about 10 minutes. Out of the package, they were anemic looking but they had to have been factory-baked because they we as risen as they were going to get and not doughy. Is there a rule of thumb as to when a loaf can be taken out of the oven and frozen so it can be thawed, buttered and finished at a later date?
See what other Food52 readers are saying.