We should all have a solid command of the ABCs of baking. Thankfully, Food52's Test Kitchen Manager Erin McDowell is here, with tips and tricks to help you master the most essential desserts and the simplest breads.
Today: Puff pastry made painless, plus an easy recipe for palmiers.
Puff pastry has been, and always will be, one of my favorite things to make. It’s one of those foods that is as much about the process as it is the final product—and I adore that. You watch the dough come together, and then you watch it turn from a shaggy mess into a smooth, beautiful dough filled with buttery layers of perfection.
Puff pastry is traditionally made through the process of lamination, which can seem, understandably, daunting. Rather than diving into that, let’s talk about the tried and true method of blitz puff pastry (which is actually a lot more like making pie dough).
Blitz takes some of the scariest parts out of the equation (there's no butter block and the process is less temperature-sensitive). You’ll still spend a little time, but it’s all around, it's lot easier—especially if you know what you’re aiming for. I’ve come to love blitz as much as traditional puff; it’s simple enough to make even somewhat last-minute, yet the results are just as flaky, buttery, and crispy (I promise).
Here’s what you need to know (or, skip straight to the recipe):
1. Scaling and Mixing
2. Rolling the Dough (Prepping for Folding)
3. First Fold
4. Second Fold
5. Third Fold
6. Fourth Fold
7. Rolling and Shaping
8. Baking
1. Scaling and Mixing
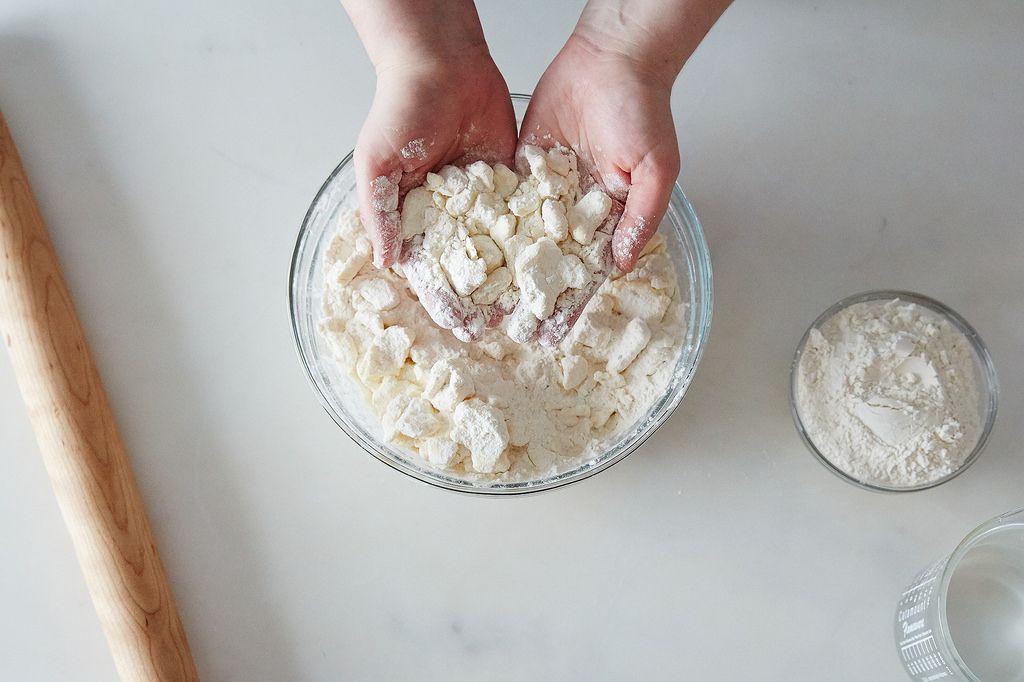
First thing's first: Start with cold ingredients. I don’t usually chill my flour, but in the heat of the summer, it can only help the process. I like to mix my dough by hand because it gives me the most control—it’s a lot harder to over-mix the dough that way. But if you have hot hands (or just a hot kitchen), an electric mixer fitted with the dough hook works, too; just follow the same instructions, mixing until the butter is the size of walnut halves. To mix by hand, toss the cubed butter into the flour to coat each piece.
After it’s well coated, begin to "cut in" or "rub in" the flour. For this task, shingle the butter between the palms of your hands or using your fingers. The idea of shingling is to flatten the butter into big, flat shards. Continue to toss the butter in with the flour as you press and smush it, re-coating the shingled pieces as you mix. Make a well in the center of the flour mixture and add the water. Mix until the dough just barely comes together, and it will be shaggy and not smooth. It shouldn’t be sticky or wet.
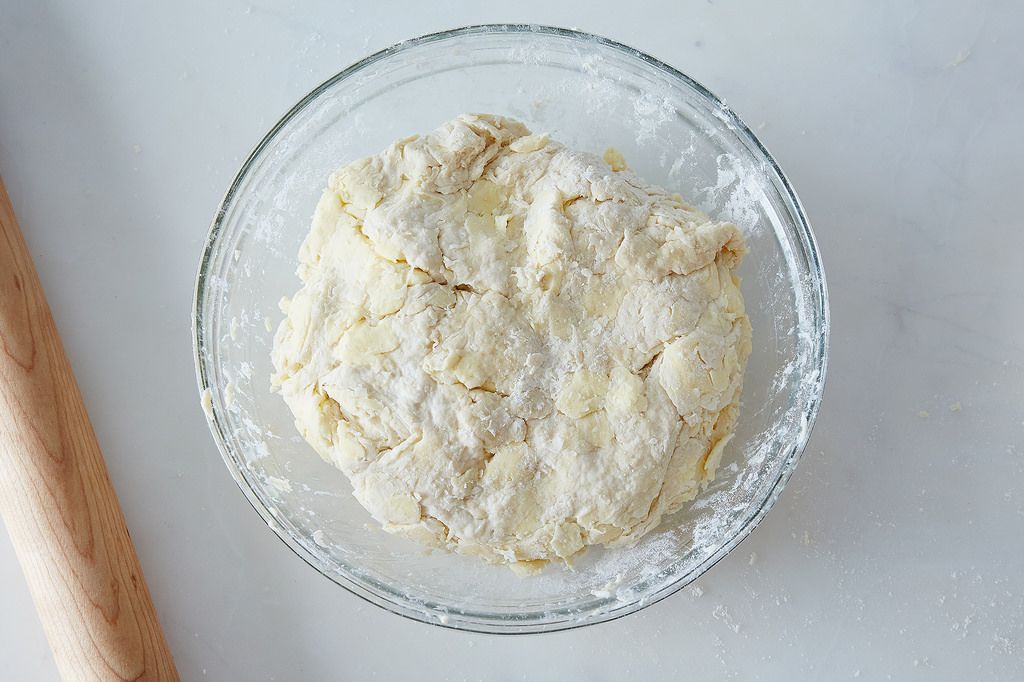
Transfer the dough to a parchment-lined baking sheet and form it into a rectangle that's about 6 by 4 inches (roughly one-third the size of a baking sheet). The size doesn’t need to be precise, just aim for making a rectangle with sharp edges and corners. Cover the dough directly with plastic wrap and transfer it to the refrigerator for 20 to 30 minutes, until the dough is chilled but still pliable.
More: To improve blitz puff pastry, just add chocolate.
2. Rolling the Dough Out (Prepping for Folding)
Once your dough is well chilled but not too form, you're ready to roll it out. If you’re having a hard time getting the dough to roll easily, it’s probably too cold. If bits of butter are breaking through the surface and getting all melty and squishy, it’s too warm. Remember that what you’re trying to do is roll out the butter thinly inside the dough; when the dough bakes, the evaporation of moisture in the butter will create steam, and this is what creates all those flaky layers. I find that 30 minutes in the refrigerator in between folds is all you need, but you may need a little more in the hot summer months or a little less in the chilly winter.
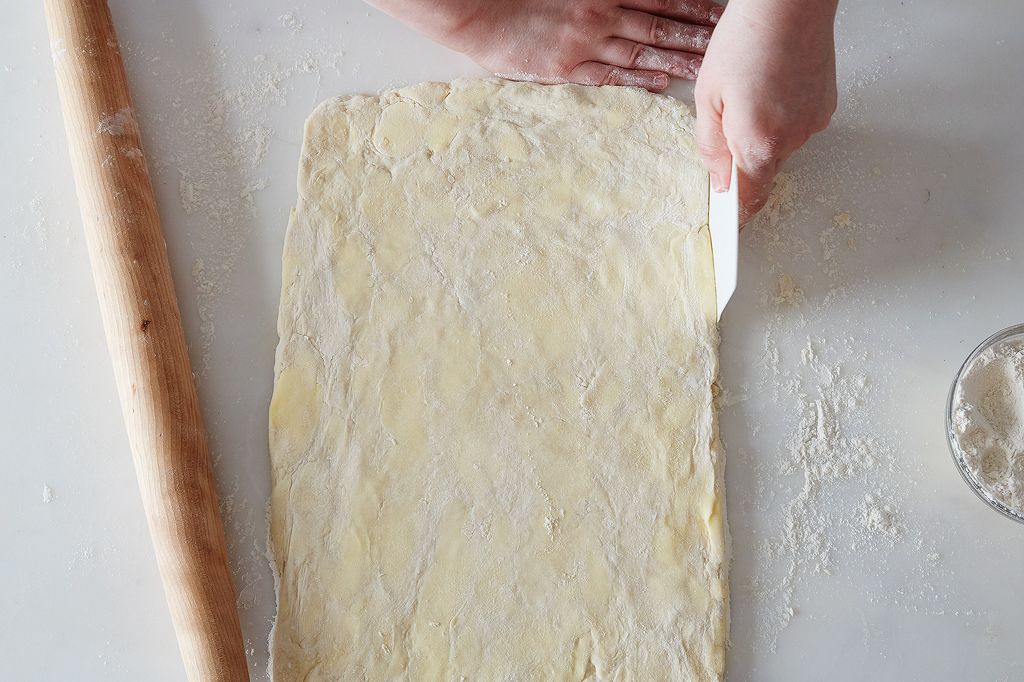
On a lightly floured surface, roll the dough out to a 3/4-inch thickness. You should end up with a rectangle approximately 10 by 25 inches. Remember that any flour you use can get incorporated into the dough, which can contribute to making it tough: Use enough flour to prevent the dough from sticking, but be judicious. Keep a pastry brush on hand to brush away excess flour as you work.
I also like to keep a dough scraper or bench knife on hand to help keep the edges straight and the corners squared off. It’s important to keep the dough as squared off as possible because it will help the edges to meet flush when you complete a fold. This basically just ensures better, cleaner layers in the finished puff pastry. (If the edges are rounded, those edges won’t meet up, and there will be gaps in the layering.) It may seem insignificant but it can make a huge difference in the end result.
3. First Fold
The folding is where it can get a little tricky (the photos in this section are a solid reference to check back on as you work). There are two kinds of folds, and the first is called a four fold. The other type of fold is called a three fold, and you'll be doing that later. (Yes, this is confusing, but it will all make sense soon! Basically, you'll do four folds total: a four fold, a three fold, a four fold, and final three fold.)
But first, focus on the four fold: Roll the dough out as directed above. When the dough has been rolled to the proper thickness (3/4-inch thick), you’ll want to fold each outside edge inward so that they meet slightly off-center. The result will look a little like an open book with an off-center spine.
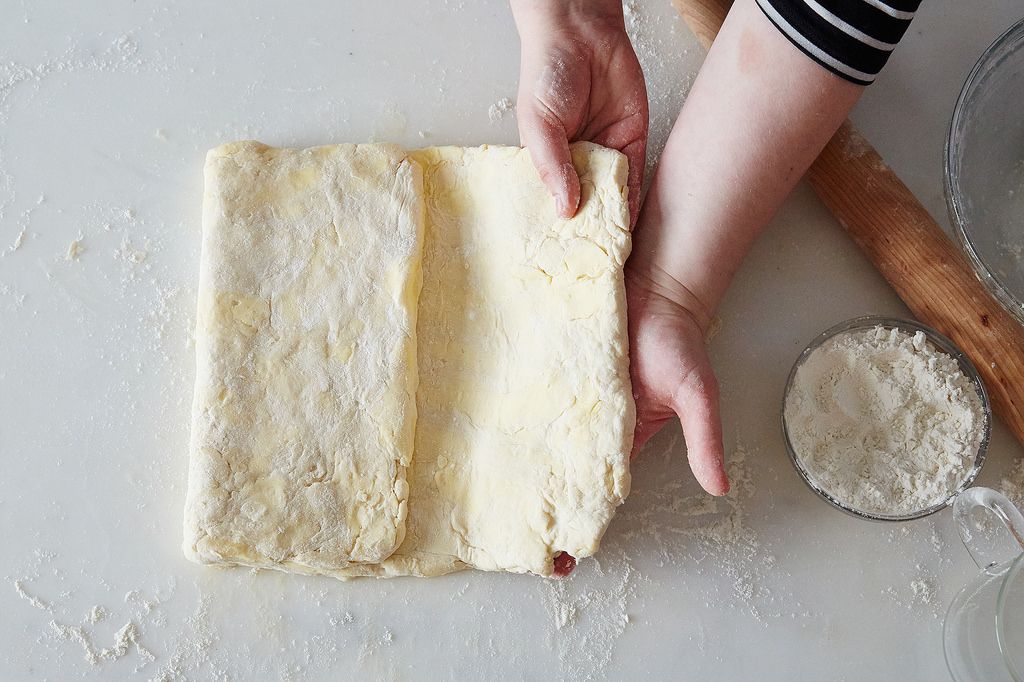
In other words: Fold the left edge toward the center, about three-quarters of the way across the dough. Fold the right edge one-quarter of the way across the dough and make sure the edges meet. (Even though it’s important for the edges to meet, don’t be tempted to squish them into place – the warmth of your hands combined with the pressure might muck up the formation of layers or warm up the butter. That's why it's important, as I mentioned above, to square off the dough before you start to fold.)
Now fold the larger half over the shorter half, hiding the seam, and transfer the dough back to a parchment-lined baking sheet. Before completing any fold, brush all the excess flour off of the surface of the dough. When you fold the dough over, if there’s noticeable flour on the surface you folded, be sure to brush that away, too. At the end of the first fold, you should still see large chunks of butter throughout the dough.
Refrigerate for 30 minutes before starting the second fold.
4. Second Fold
The second fold—which is a three fold—is a little easier to describe. Remove the dough from the refrigerator, lightly flour your surface, and roll the dough out again into your 3/4-inch thick rectangle.
Fold the left edge of the dough one-third of the way over the dough. Fold the right edge one-third of the way over the dough as well, resting it on the piece you just folded over (so that you have three layers of dough). Think of it like folding a piece of paper to fit into a standard-size envelope. The same rules apply as they did with the first fold: Brush away excess flour, try very hard to keep the dough rectangular in shape, and do your best to make the ends meet up as closely as possible.
At the end of the second fold, there will still be some visible chunks of butter in the dough.
5. Third Fold
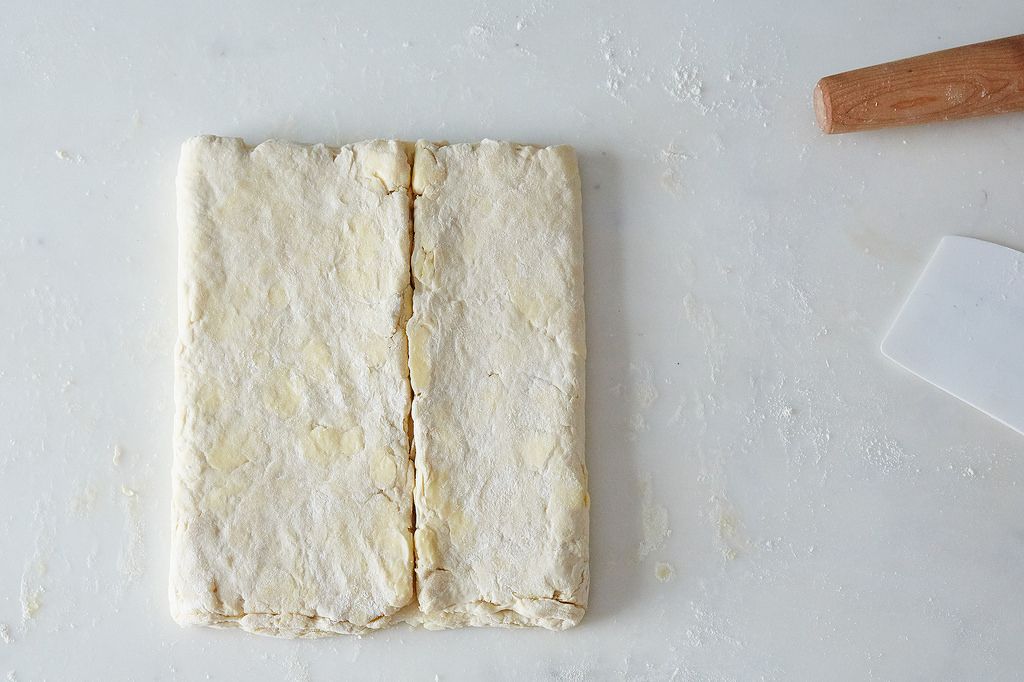
The third fold is a repeat of the first one, so just follow those instructions again. Sometimes, the dough is still cool enough after completing this fold that you can proceed right onto the last fold. However, don’t rush it if you think your dough has warmed up—your flaky layers will suffer the consequences. But often (mainly because you’re more comfortable with the process at this point), you can work quickly enough to complete both folds back-to-back. At the end of the third fold, the dough will be visibly lighter in color and smoother in texture.
6. Fourth Fold
The fourth and final fold is a repeat of the second fold, so just repeat that step again.
By the end of the final fold, the dough will be very smooth with almost no visible chunks of butter—just a beautiful, light pastry. It’s sort of an amazing transformation.
7. Rolling and Shaping
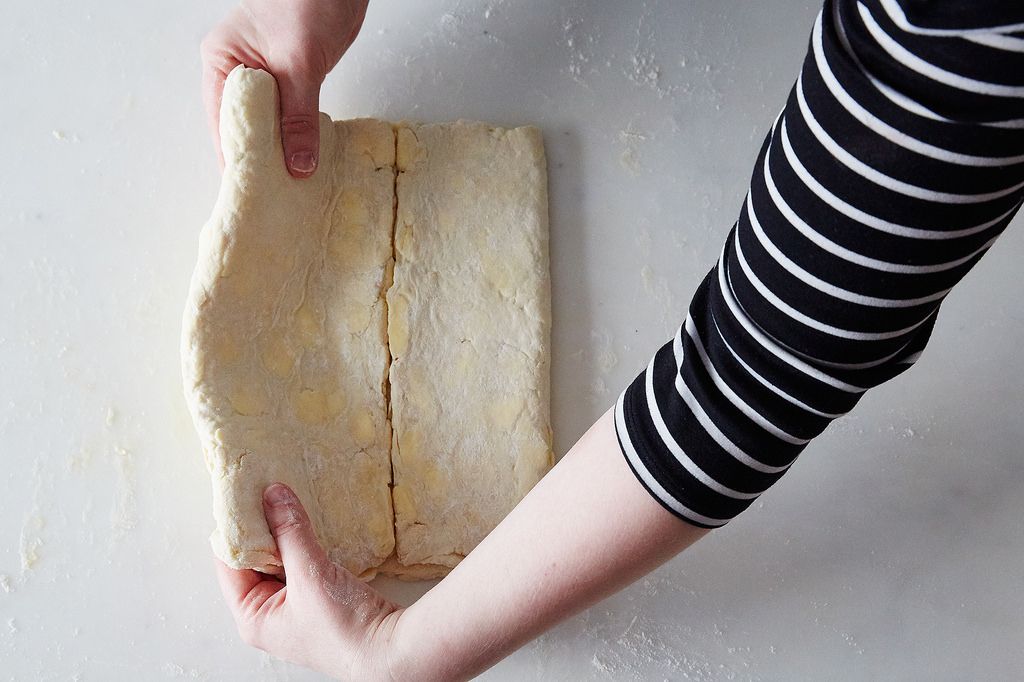
Once all of the folds have been completed, you have successfully faux-laminated your puff pastry. Hooray! If the dough is still chilled after this fold, you can proceed with shaping. If the dough feels slightly warm, wrap and refrigerate again for 20 to 30 minutes.
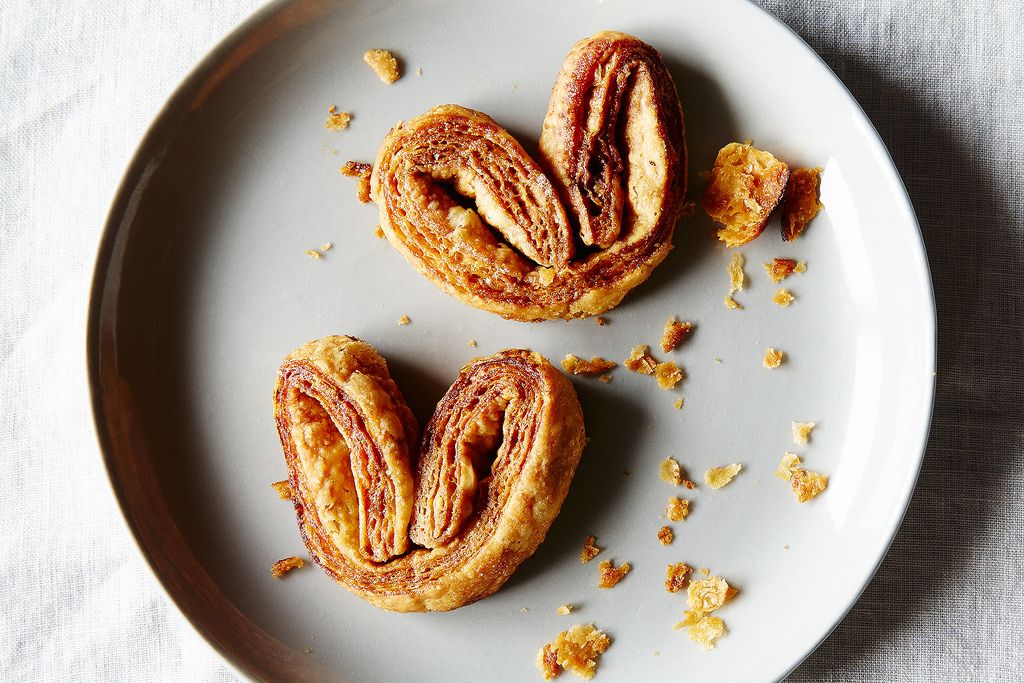
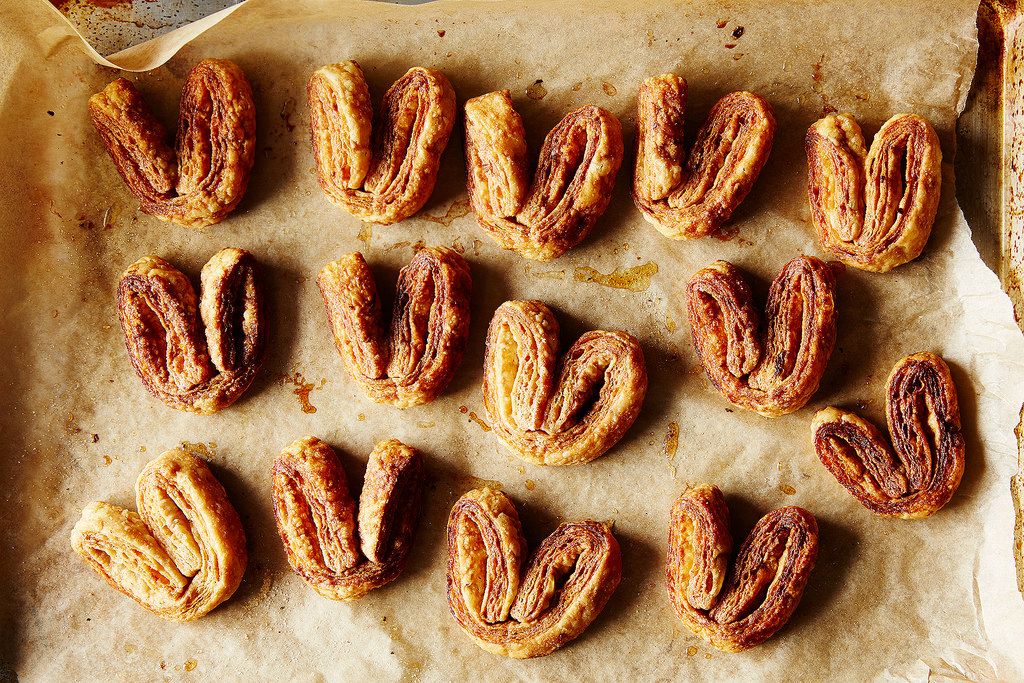
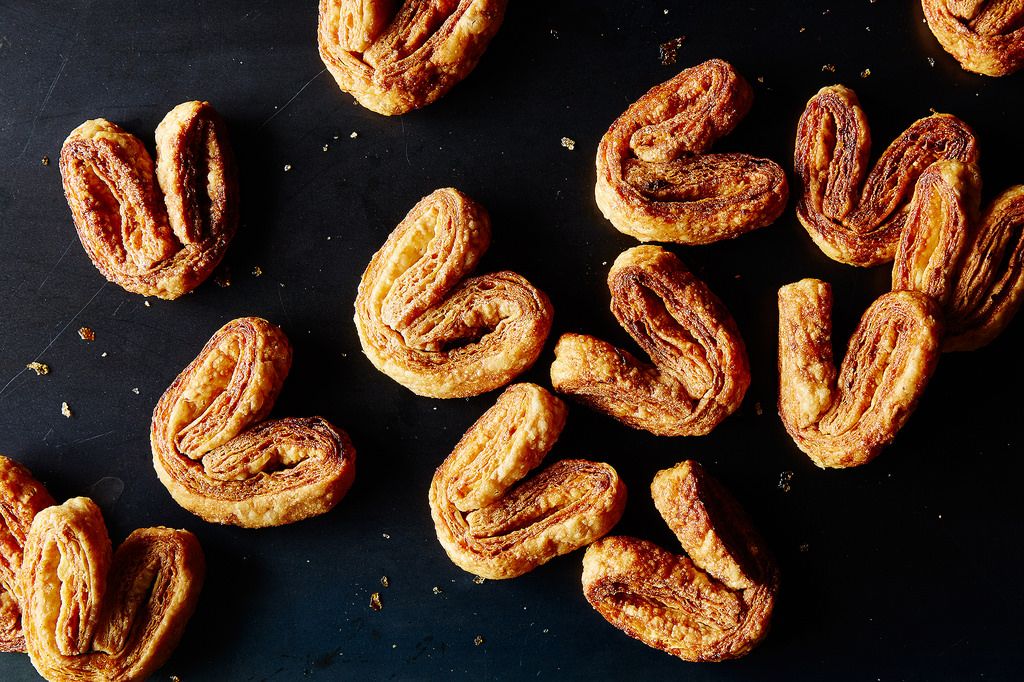
Now the dough can be rolled out and used to make tarts, savory cheese twists, and anything else your heart desires. One of my favorite things to make with puff pastry is palmiers (often called “Elephant Ears”). The puff pastry is rolled thin, coated in vanilla sugar, and baked at a high temperature to create a crispy, crunchy, caramelized treat.
Before rolling out the chilled dough, use a bench knife or a sharp chef’s knife to cut it in half.
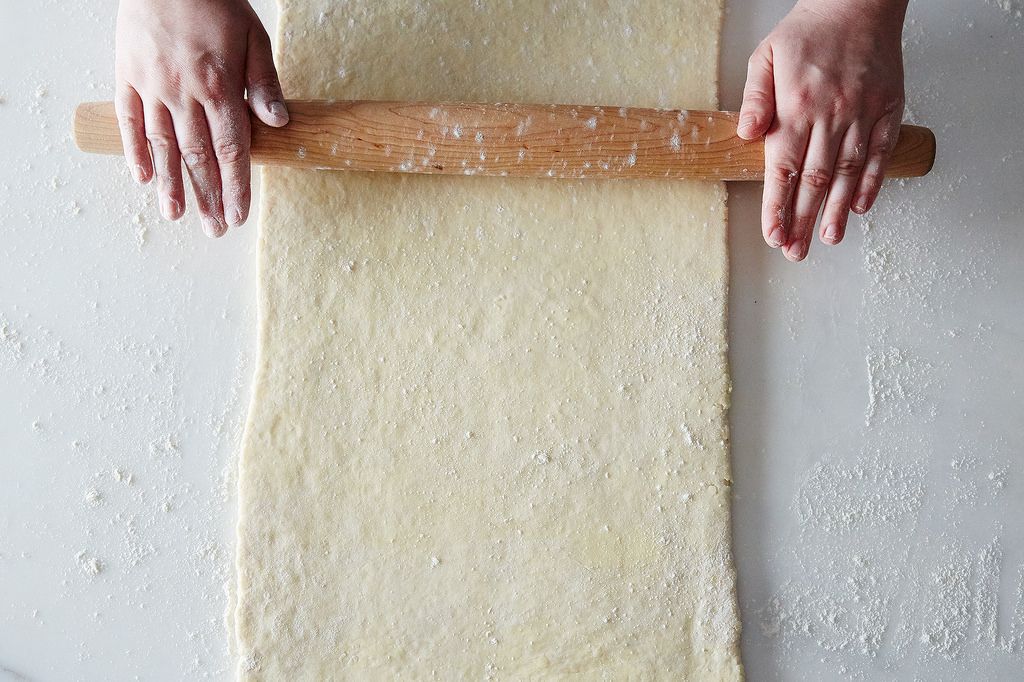
To shape the palmiers, roll out the dough on a lightly floured surface to 1/2-inch thick. Try to maintain the rectangular shape while you roll, and aim for a finished size of around 13 by 15 inches. If the dough’s edges are rough or wavy, you can trim them away to make clean edges.
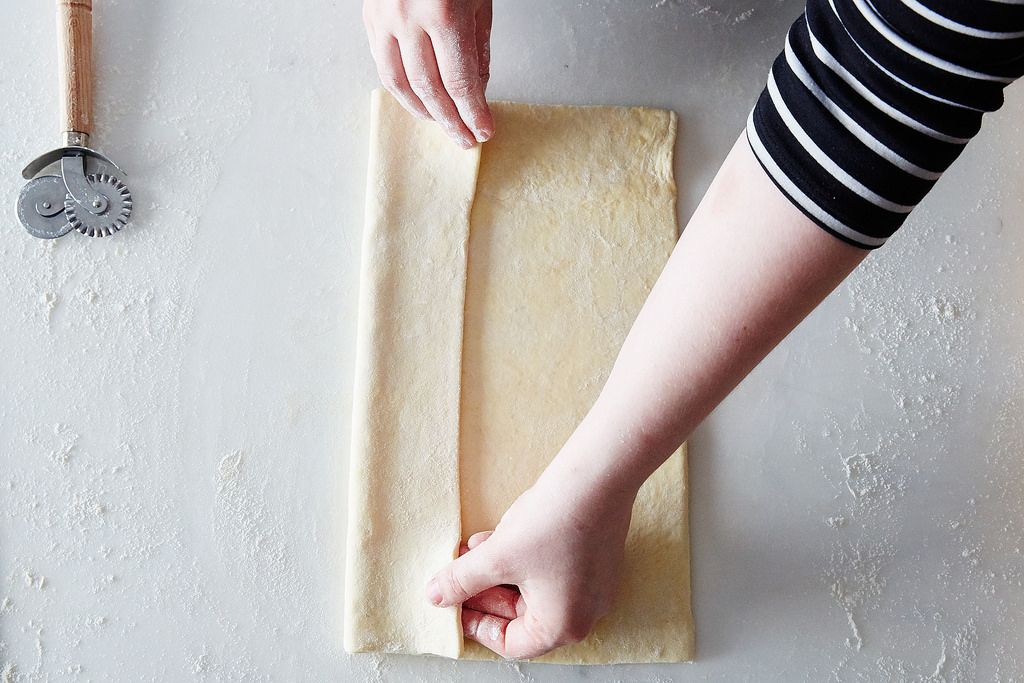
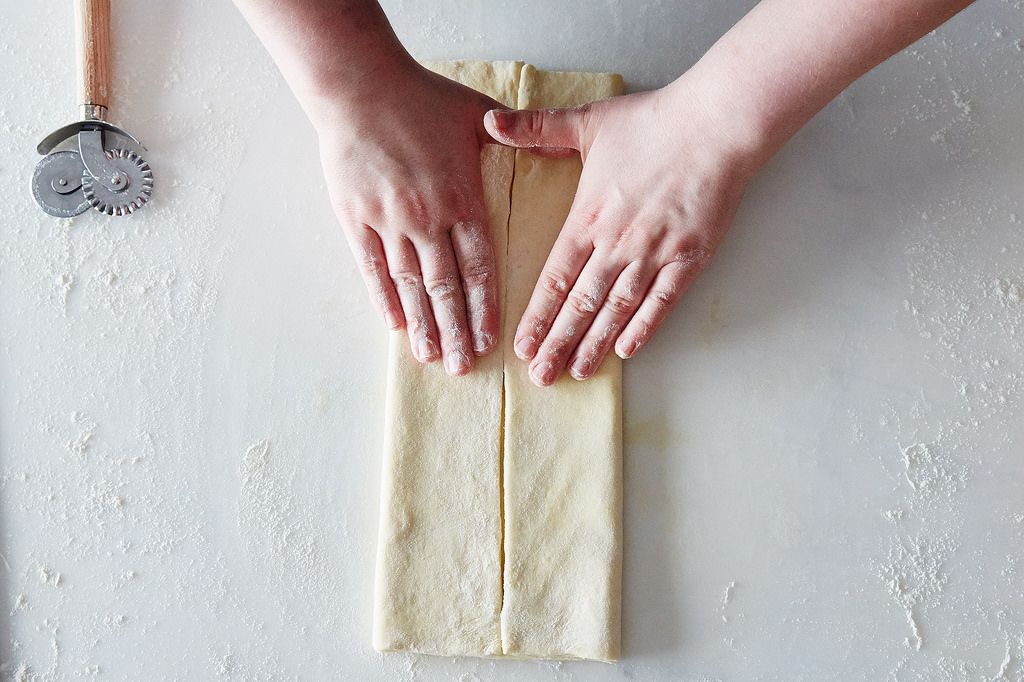
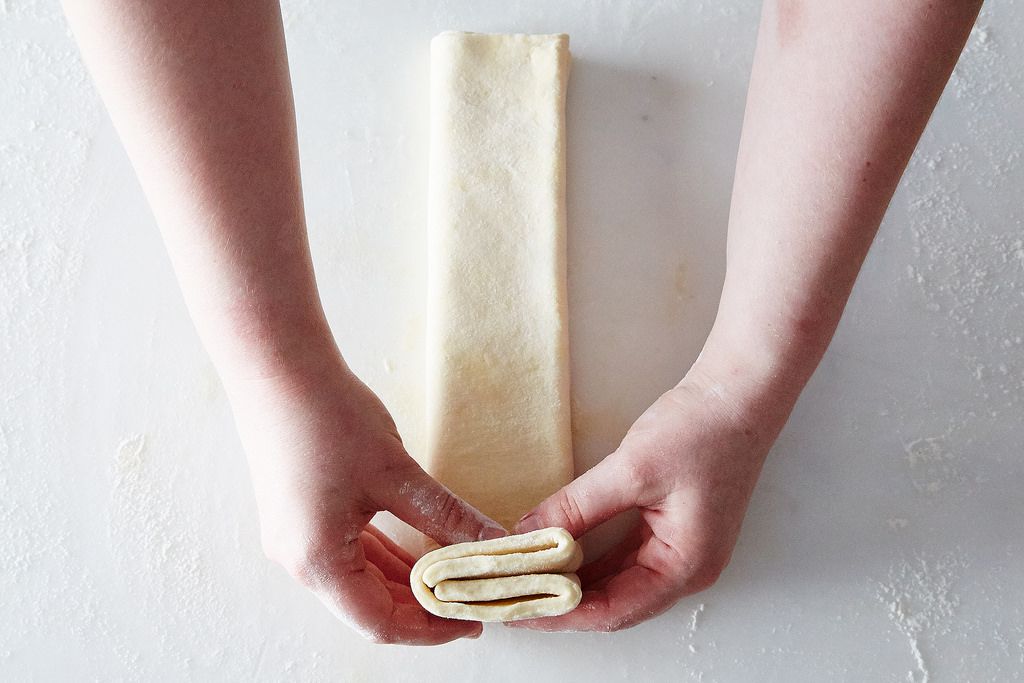
Sprinkle a few tablespoons of vanilla sugar over the dough and use your rolling pin to gently press in the sugar. Fold the edges from the longer side inward, meeting each other exactly in the center of the dough. Fold one half over onto the other half. The resulting shape looks a bit like a heart and is also often referred to as an “elephant ear.”
More: When you make your own scented sugars, you can get creative with how you flavor palmiers.
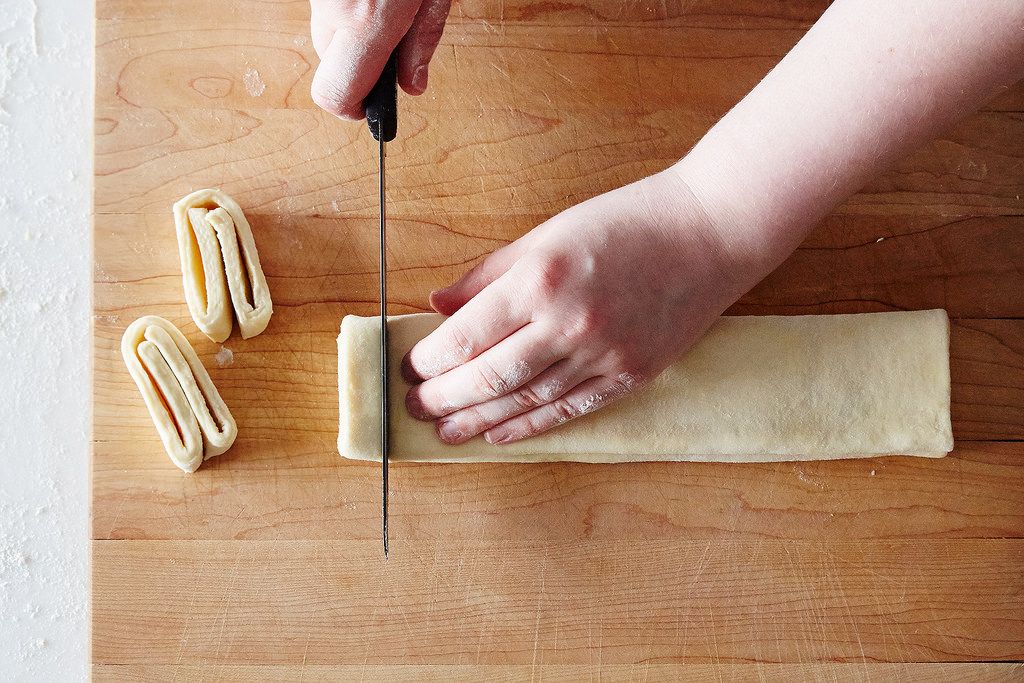
Use a sharp knife to slice the log of dough into individual pieces about 1/2-inch thick. Dip both sides into the vanilla sugar and transfer them to a parchment-lined baking sheet.
8. Baking
It’s important to bake palmiers (and other puff pastry treats) at a relatively high temperature. This contact with high, intense heat is what causes the moisture in the butter to evaporate and produce steam, and the steam is what pushes the dough up, creating lots and lots of layers. If your dough is warm after shaping and cutting, let it chill in the refrigerator or freezer for a few minutes.
Recipes will vary, but generally speaking, puff pastry items are baked between 400 to 450° F (my palmiers bake at 425° F). Bake puff pastry until it is very golden. If you bake them until only lightly brown, they will still taste buttery, but the palmiers will not be as crispy as they should be, and they will get soggy faster with shorter storage life.
These types of treats are generally best consumed the same day they are baked, but remember that you can do all the folding and shaping ahead of time. I even like to shape palmiers and keep the logs in my freezer, ready to be sliced when I have guests (or, let’s face it, a buttery, sugary craving).
Palmiers (Made with Blitz Puff Pastry)
Makes about 2 dozen palmiers
1 pound (3 1/3 cups) all-purpose flour
1 1/4 teaspoons (10 grams) kosher salt
1 pound cold unsalted butter, cut into 1/2-inch cubes
9 fluid ounces (1 cup plus 2 tablespoons) cool water
Vanilla sugar, as needed for coating
See the full recipe (and save and print it) here.
Photos by James Ransom

It's here: Our game-changing guide to everyone's favorite room in the house. Your Do-Anything Kitchen gathers the smartest ideas and savviest tricks—from our community, test kitchen, and cooks we love—to help transform your space into its best self.
Grab your copy
See what other Food52 readers are saying.