Every week, a DIY expert spares us a trip to the grocery store and shows us how to make small batches of great foods at home.
In honor of Ice Cream Week at FOOD52, Cannelle et Vanille's Aran Goyoaga shares a gadget-free way to make tuile cones for your next batch of ice cream. Aran is the author of Small Plates & Sweet Treats, which comes out this fall.
One January, each blogger participating in the Daring Bakers challenge was given three tuile recipes. We had to choose one and build a dessert around it. A pretty simple task that had my brain spinning for days -- "What to do, what to do?" Sometimes simple doesn't mean easy, but that is what I liked about the challenge. It is wide open to each individual's imagination.
Although I only followed one of the recipes given to us, I created similar tuiles with slightly different methods.
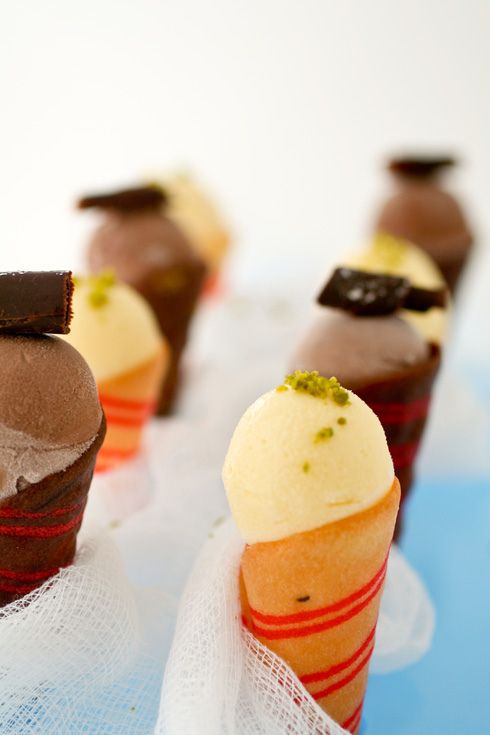
I had many ice creams and sorbets in the freezer so immediately thought about making chocolate and vanilla ice cream cones with the sugar tuile recipe. I paired the cones with chocolate and devonshire lemon ice creams. I was inspired by the bi-color Italian cookies we used to eat with ice cream growing up.

Here's how to make your own, without buying any fancy new gadgets.
Vanilla and Chocolate Tuiles
Makes about 12 small cones
Adapted from “The Chocolate Book” by Master Chef Angélique Schmeinck.
1/4 cup softened butter (not melted but soft)
1/2 cup sifted confectioner’s sugar
1 sachet vanilla sugar (or substitute with a dash of vanilla extract)
2 large egg whites (slightly whisked with a fork)
1/2 cup sifted all purpose flour
1 tablespoon cocoa powder
A couple of drops of red food coloring
Preheat your oven to 350 degrees F.
Using a hand whisk or a stand mixer fitted with the paddle (low speed), cream butter, sugar and vanilla to a paste. Keep stirring while you gradually add the egg whites. Continue to add the flour in small batches and stir to achieve a homogeneous and smooth batter/paste. Be careful to not over-mix.
Mix a small amount of the batter with red food coloring and some with cocoa powder.
Cover the bowls with plastic wrap and chill in the fridge for at least 30 minutes to firm up. (This batter will keep in the fridge for up to a week, take it out 30 minutes before you plan to use it).
Line a baking sheet with a silicon mat. Place a stencil with a circle cut out (about 4" in diameter) on the mat. Press the stencil on the baking sheet and use an offset spatula to spread the chocolate and vanilla batters. Leave some room in between your shapes. Place the red batter in a paper piping bag and pipe lines on the circles.
Bake in a preheated oven (350F) for about 5-10 minutes or until the edges turn golden brown. Immediately release from baking sheet and proceed to shape into cornettes. Keep them in an airtight container until ready to use.
Save and print the recipe here.
Read more about tuiles in Aran's original post on Cannelle et Vanille.
Aran will be answering questions about tuiles on the Hotline for those of you who want to take on this project at home. For the quickest response, go to her recipe and ask a question from there -- we'll email her your question right away!
Tune in next week, when Cathy Barrow will share her recipe for a softly spiced, smoked Italian Salami Cotto.
See what other Food52 readers are saying.