Breakfast

Christina Tosi's English Muffins + Pickled Strawberry Jam

June 21, 2013

Every Friday, a DIY expert spares us a trip to the grocery store and shows us how to make small batches of great foods at home.

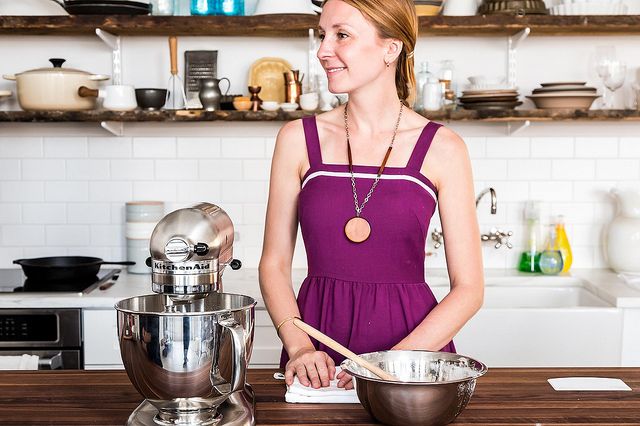
Christina Tosi of Momofuku Milk Bar recently stopped by the Food52 office to teach us how to make her perfect English muffins. Today, she's sharing the recipe, step by step -- plus a pickled strawberry jam to smear on top. 


Shop the Story

I used to make family meal dessert when I was a cook at wd~50. Over time, just making one dessert wasn't enough to satisfy my love of baking, so I started branching out and making morning or late-night baked goods on top of my family meal desserts. First up was English muffins (one of Wylie's favorites). I would make a batch nearly every day and we'd dissect the room for improvement in each batch, from technique to overall flavor. I spent every day for months getting this recipe just right. It's tried and true, and easily one of my favorites.

Since then, we've used the recipe in our kitchen at Milk Bar to make bite-size English muffins for a bread course at Ko (schmeared with bay leaf-infused whipped lardo), as a loaf bread, as a cracker, or for family meal featuring Eggs Benedict or burgers!

English Muffins

Makes 2 dozen full size English muffins

2 1/3 tablespoons active dry yeast (a little less than the contents of two 1/4 ounce packets)
1/4 cup lukewarm water
1 3/4 cup buttermilk
4 cups bread flour, plus more as needed
1/4 cup sugar
1 2/3 tablespoon kosher salt
5 tablespoons unsalted butter, at room temperature
Nonstick vegetable spray
Cornmeal as needed (or yellow grits, in a pinch)

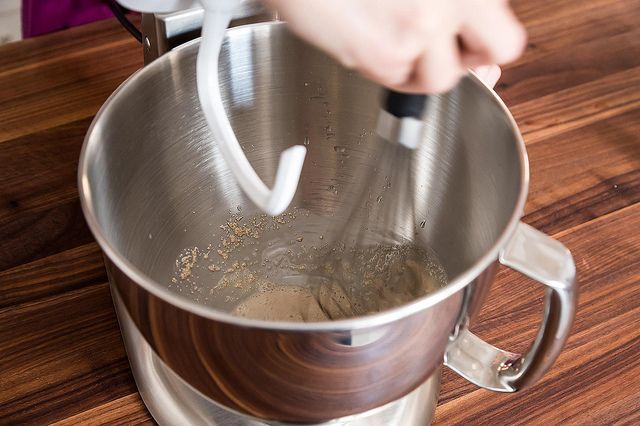
Combine the yeast and water in the bowl of a stand mixer outfitted with the dough hook and whisk together to dissolve the yeast.

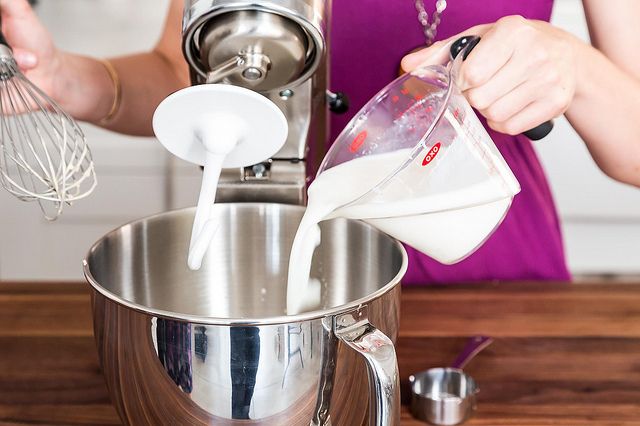
Nuke the buttermilk in the microwave for 20 to 30 seconds, or warm it over low heat in a small pan on the stovetop just until it loses the refrigerator chill; you’re not really heating the buttermilk, but ensuring that chilly milk won’t retard the dough’s rise. Stir the no-longer-cold buttermilk into the yeast and water.

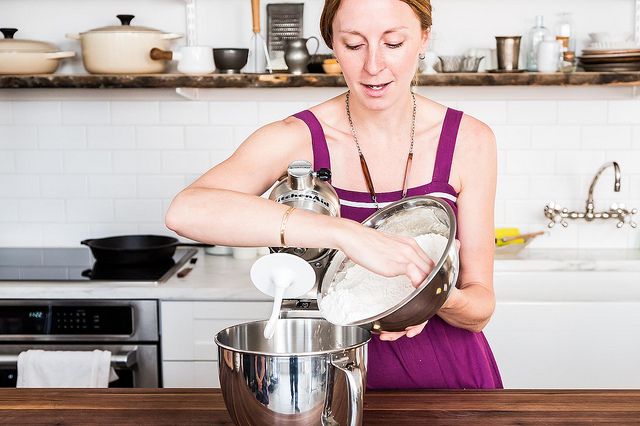
Add the flour, sugar, and kosher salt to the bowl, turn the mixer on to low/medium-low speed, and process just until it comes together as a shaggy, droopy dough -- about 3 to 4 minutes.

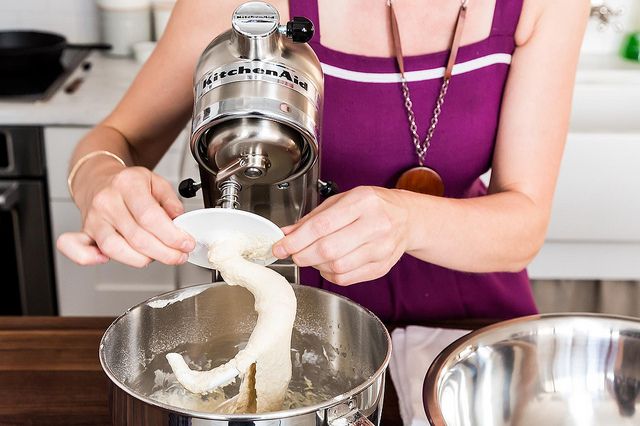
With the mixer still running, add the butter to the dough a tablespoon at a time. (Make sure it’s at room temperature -- you’ll overwork the dough trying to incorporate cold butter into it.) 

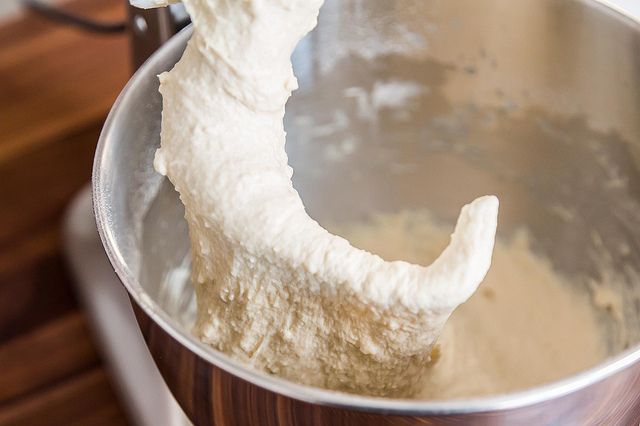
The dough will look as if it is separating, and from this point on it will hang out at the bottom of the bowl, reaching up the dough hook like an appendage of the sandman but never fully coalescing into a ball again. Knead it in the stand mixer for 7 to 8 minutes, by which time it should be tacky but no longer sticky and hold its shape.

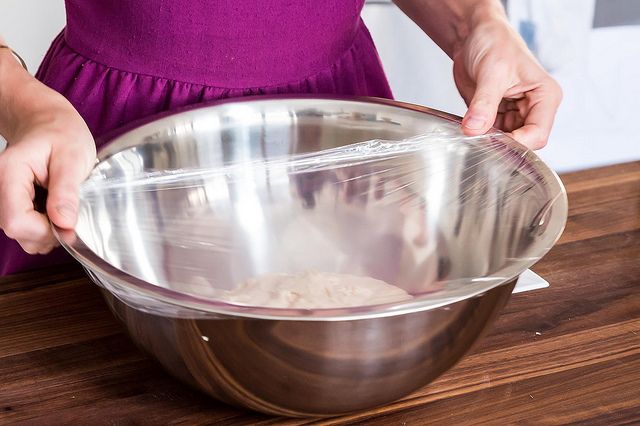
Lightly spray a large mixing bowl with oil. Using a rubber spatula, scrape the dough from the mixer bowl into the greased bowl. Cover with plastic wrap and leave the dough to rest, relax, and rise (though it doesn’t rise so much as it expands in the bowl) for one hour. After the dough has risen, put it into the refrigerator for 30 minutes to an hour to chill, to make it easier to handle. 

While the dough’s resting, line a couple of rimmed baking sheets with parchment paper and cover them each with a 1/4-inch deep layer of cornmeal, into which you will nestle your muffins. (That’s way more cornmeal than will stick to the muffins, but whatever’s left over will be fine to use in another recipe.)

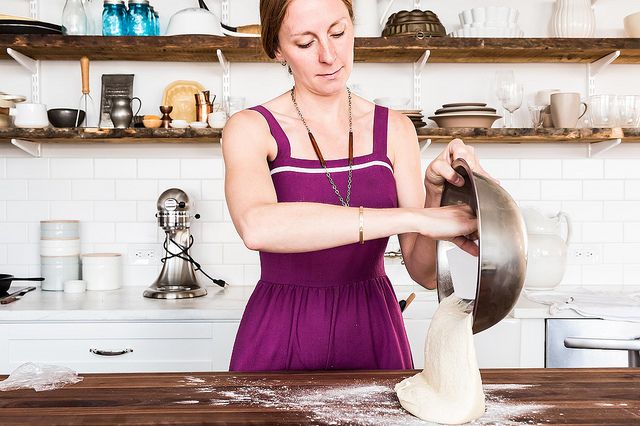
Scatter your work surface with a very, very fine dusting of flour, and very lightly flour your hands. Turn the dough out onto the work surface and knead it a few times to deflate it. Shape it into a fat, smoothish log.

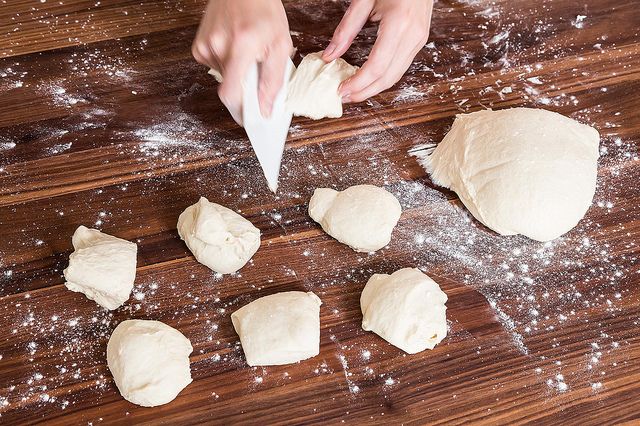
For traditional-size English muffins, pinch off pieces about the size of a handball (they should weigh about 60 grams).

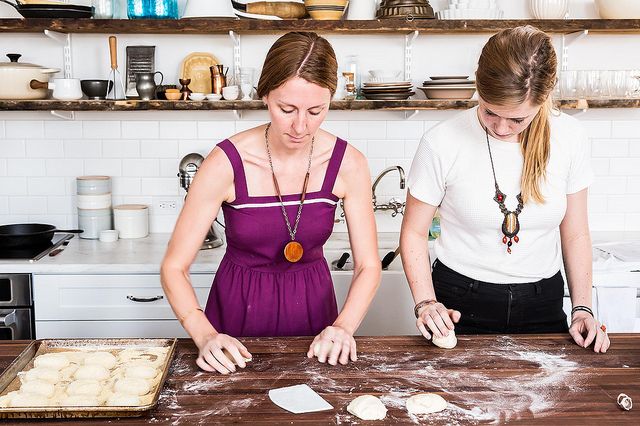
With lightly floured palms, roll the pieces of dough into neat balls, applying as little pressure as possible. The dough should be pillowy and tender and delicate and have the tiniest bit of spring to it. 

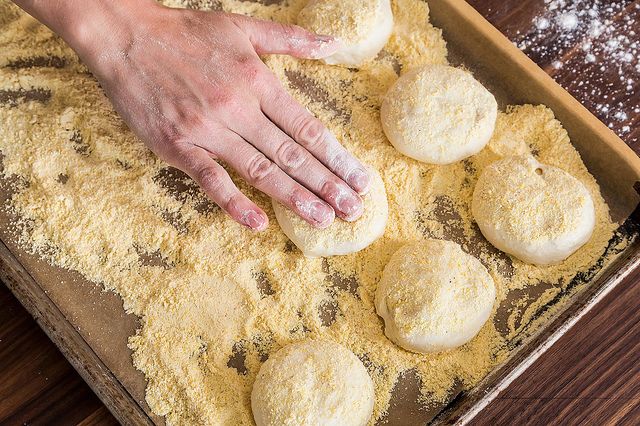
As you shape them, transfer the balls of dough, one by one, to the baking sheet: Nestle each ball of dough into the cornmeal, then pat it down gently so some of the cornmeal adheres to the bottom of the future muffin. Grab the ball very gently by its sides (the parts you don’t want cornmeal on), and flip it over, gently patting the cornmealed top so the bottom picks up some of the cornmeal.

Leave about an inch between the muffins, giving them enough space to stretch and rise as they may need. You can proceed with the recipe directly, or you can wrap the baking sheets of proofing dough in plastic wrap and put them in the fridge to chill for 30 minutes, after which time the muffins will be easier to handle. You can also take a longer break: wrapped and refrigerated, the muffins will keep (and improve) for up to 3 days.

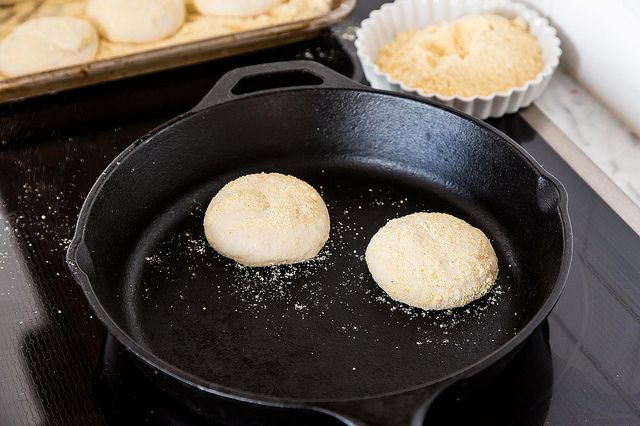
Turn the oven on to 250°F. Warm a cast-iron skillet or griddle over the lowest heat setting possible for 5 or so minutes. You should be able to comfortably hold your hand very close to the pan and just feel some radiant heat—nothing that would make you want to pull your hand back. Scatter the pan with a thin, even layer of cornmeal and warm for a minute more.

Grab the proofed muffins one by one by their uncornmealed sides, dust off any excess cornmeal clinging to their tops and bottoms (you want a thin, even coating, not a thick jacket), and transfer them to the pan, working in batches. This is the all-important nook-and-crannies-forming stage of English muffin cookery: you want the muffins to rise and griddle-bake slowly. You almost can’t take enough time with this stage. (And if at any point before the final couple of minutes of cooking you smell cornmeal toasting or browning, instead of just warming, turn the heat down.) 

After about 4 minutes, their tops will begin to puff and dome: that’s your cue to flip them. Use a small offset spatula to flip them if you have one (and buy one to do so the next time if you don’t -- your fingers will leave prints). After 4 or 5 minutes on the second side, the bottoms of the muffins should still feel airy and light. Once they’re at that point (you may have to gently cook and gently flip them one more time before they get to the handleably delicate stage), you can nudge up the heat slightly, and turn them every 2 to 3 minutes, to toast their tops and bottoms. (Here the smell of toasting cornmeal is okay.)

When the muffins are toasted -- tops and bottoms mottled with brown, but mainly golden -- transfer them to a baking sheet, and put them in the oven for 10 minutes to finish baking. Remove from the oven and let them cool on the baking sheet until they reach room temperature.

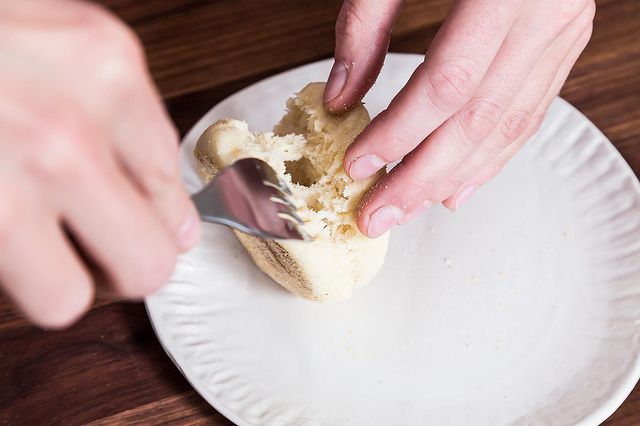
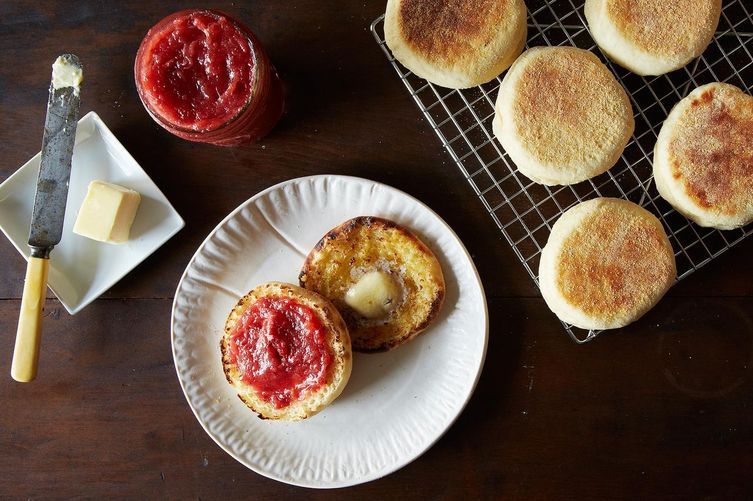
Use the tines of a fork to puncture an equator of tiny holes around the middle of each muffin, and then pry them apart into two halves. [Editor's note: Christina calls this the "baller move".

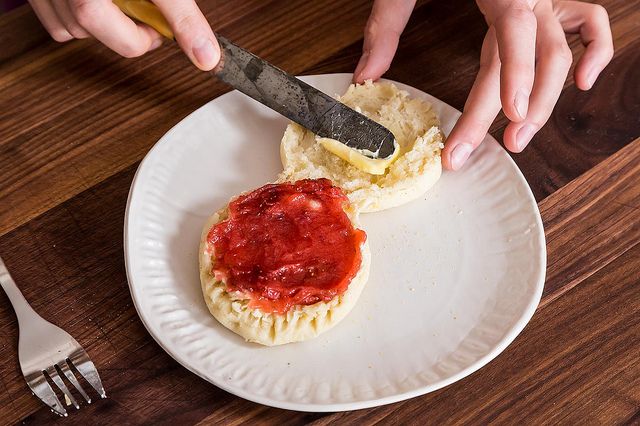
Your muffins are now ready to be seared (with a light spread of butter) and spread with pickled strawberry jam!

See the full English Muffin recipe (and save and print it) here.
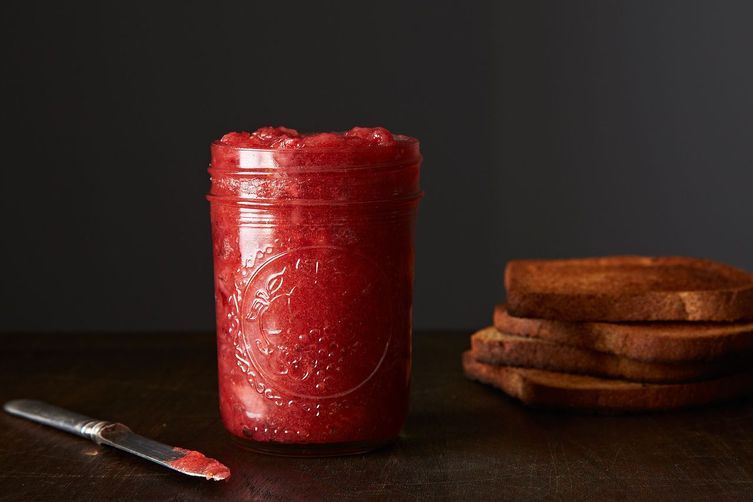
Pickled Strawberry Jam

Pickled Strawberry Jam

Makes 3 cups

1 3/4 cup sugar
1 tablespoon powdered pectin
1 teaspoon salt
3 cups strawberries, hulled
2 tablespoons sherry vinegar
1 tablespoon rice wine vinegar
5 pieces coriander seeds
1 piece cardamom pod

See the full recipe (and save and print it) here.

We had so much fun baking with Christina. If you want to read more of her story -- and get more of her signature recipes -- grab a copy of the Milk Bar Cookbook. Just don't blame your sugar high on us.

Tosi Roxx

Photos by James Ransom

See what other Food52 readers are saying.

  • Smaug
    Smaug
  • Martin Belderson
    Martin Belderson
  • 1234cake
    1234cake
  • Emm
    Emm
  • JazzDragon
    JazzDragon
I'm a homey cook meets a formally trained pastry chef. I love to smile, I love to work hard, I love to eat! I opened Milk Bar nearly 5 years ago and have never looked back...

43 Comments

Smaug May 3, 2016
I much prefer a batter type recipe, but one way or the other, you really need to use rings, not only for the shape but so that they will split properly.
 
Martin B. February 5, 2015
I came for the pickled jam recipe. It's excellent. But - having a reliable muffin recipe I've used for years - did not pay much attention to the main recipe. When I did, I was shocked. Is there some mistake about the amounts of yeast, salt, and sugar? They're way over-the-top. You really do not need these quantities. So much yeast is unnecessary and will affect the taste of the English muffins. I imagine the salt content has been upped to retard the yeast and but it is now extremely high, almost three times what you'd expect to use for this quantity of dough. The sugar is at least double the quantity used in all the other (British) cookbooks I've looked up - four of them. Perhaps the extra sugar is there to mask the saltiness? It's the kind of trap you can get into with yeast. Large amounts of yeast = high salt = high sugar = more yeast because sugar slows fermentation and so it all spirals out of control.

Cut the quantities in half and you will have healthier, cheaper, tastier, more authentic English muffins.

Still love the jam.
 
Smaug August 7, 2015
The sugar should be mostly consumed by the yeast- English muffins are about the only bread that I use any sugar in, and they don't taste at all sweet.
 
1234cake August 30, 2013
Well, I really wish I would have read all of the comments on the Small Batch post for this recipe before I got started. I also took the time to convert the dry ingredients to weights, and found the dough to be woefully wet. I added in a good bit more flour and the dough came together ok--though it seems stickier than it should be. I have it resting in the fridge now, and we'll see if it is workable to shape the muffins though I have my doubts. I really think the measurements for this recipe should be given a retest.
 
Smaug August 7, 2015
The dough should be very wet, in fact many people prefer to make muffins from a batter.
 
beejay45 September 17, 2015
Maybe this is why you can make them without using the rings??? A really wet dough is what gives you the big bubble inside, too, like it does in ciabatta.
 
Emm July 24, 2013
Please clarify amount of yeast. 2 1/3 tablespoons is more than 6 teaspoons yet it states less than 2 pkts of yeast. A packet is 2 1/4 teaspoons. Doesn't make sense.
 
AntoniaJames July 24, 2013
There seems to be an error in the ingredient list. The parenthetical says a little under two packets, but if a packet is 2.25 teaspoons, by my calculations, it should say "(a little less than the contents of three 1/4 ounce packets)" not "two 1/4 ounce packets". I haven't made these yet, but I plan to, soon. ;o)
 
Emm July 24, 2013
Thanks for confirming the error Antonia, I thought I wasn't reading correctly. I'm going ahead with the recipe with 1 pkt of yeast.
 
breadwhisperer July 24, 2013
That confused me too, but since I had a one pound bag of yeast instead of packets, I chose to ignore it! 2 TBS + 1 tsp instant yeast worked beautifully. Emm, not sure if your comment above is a typo - but as Antonia points out, you would need 3 packets, not one :)
 
AntoniaJames July 24, 2013
Actually, Emm, it seems that to get the two tablespoons of yeast, you'll need three packets, if each has 2 1/4 teaspoons, and the recipe requires 7 teaspoons. If it were me, I'd just dump all three packets in, because that would get to me within 1/4 teaspoon of the 2 1/3 tablespoons called for and that's close enough for me. ;o)
 
Emm July 25, 2013
Not a typo breadwhisperer, I'm going with 1 pkt of yeast. Generally speaking, a pkt of yeast will rise 3 cups of flour. For my taste, I think the yeast stated in the recipe is too much, too "yeasty" a flavor. I do have the dough doing a slow rise in the fridge until tomorrow since I ran out of time. I'll report back with my results. Thanks for all the input!
 
JazzDragon July 23, 2013
I think I have access to 2 cast iron pans but I'm wondering, this has to be done in them right? So I have to raise and lower my oven temp for 4 of them, then lower oven temp and start over if I wanted to make them all in one batch?
 
alyssa July 23, 2013
Hi, Great recipe by the way! but how long will these stay in the freezer because i would prefer to make them and just take them out and cook when needed which might not be within 3 days?
 
Allison A. July 14, 2013
Great recipe for a novice English Muffin baker! The only hiccup I found was that the dough was still too wet after adding the required 4 cups of flour, so as breadwhisperer did, I added flour slowly until it felt right! Great recipe and will definitely do this again!
 
Jennifer A. July 4, 2013
So much fun, and so much easier than I could have imagined. I used the bread whisperer's weight measurements and they turned out perfectly. Thanks for posting - the photos really helped.
 
breadwhisperer June 28, 2013
I made 20 muffins from this recipe - about 60 g each, and ended up baking them over a period of 3 days. (It was an English Muffin "Vertical Tasting.") They were all good, but I most liked the muffins that were baked after a 24 hour rest in the fridge.
 
Shawn H. June 28, 2013
fun to do that!
 
Chris C. June 25, 2013
Thanks, Breadwhisperer, for taking the time to record the weights! That does seem like a crazy amount of yeast. I'm going to give it a try.
 
breadwhisperer June 25, 2013
Just made these and - WOW!!! I followed the recipe exactly (even though I was worried that the large quantities of yeast and salt were typos.) They look exactly like the pictures above, and they taste heavenly. I prefer to weigh ingredients, so I recorded the equivalents for next time. If anyone is curious, here is what I used:
Water 56g
Buttermilk 407g
Sugar 50g
Butter 70g
Flour 620g (I started with 480g of flour, and kept adding until the dough felt right. This corresponds to a hydration of 75%.)
The only thing I will do differently next time is use a smaller burner. After 4 minutes the first side was a little too brown.
The muffins are barely sweet, perfectly salty, and taste of a hint of vanilla (even though there is none!) Thank you Christina for sharing this beautiful recipe!
 
paseo June 28, 2013
from another one who prefers weights, thanks for doing and posting this
 
AntoniaJames July 24, 2013
Me, too. Thanks so much breadwhisperer. How much yeast did you use? As others have mentioned, there seems to be an error in the ingredient list. The parenthetical says a little under two packets, but if a packet is 2.25 ounces, it seems like it should be 3 packets of yeast, not 2. I plan to make these soon! ;o)
 
AntoniaJames July 24, 2013
Sorry, I meant to say, if a packet is 2 1/4 teaspoons, not 2.25 ounces. Way too much happening here today. ;o)
 
Chris C. June 25, 2013
Please, start using grams and/or ounces. At least for baking recipes.
Please?
 
AntoniaJames July 24, 2013
Hear, hear. I've gotten so I can do conversions in my head, but with recipes given in volume, you never know what the actual weights were in the published recipes, given the vagaries and variations in volume measuring techniques. ;o)
 
Heather B. June 24, 2013
I couldn't smell or taste either the coriander nor the cardamom in the wine mix,
and certainly not in the jam. What did I do wrong? I followed directions exactly.
 
breadwhisperer June 24, 2013
I'm going to try this tonight - the technique of "baking" on a skillet looks wonderful!! One question: When I make bagels, I substitute levain for all but 1/4 tsp of the yeast. If I tried that here, do you recommend substituting sweet milk for some of the buttermilk?
 
sexyLAMBCHOPx June 23, 2013
My farmer's market and local gourmet market has been selling English Toasting Bread. It makes for an amazing BLT sandwich. I wonder if the recipe could me made into a loaf, hmmm.....
 
102bleu June 23, 2013
years ago i made english muffins using james beards english muffin bread recipe...just adjusting the shape and cooking method. i loved making them...i will surely try this recipe soon. there is nothing like home made english muffins...i wonder if folks think they can truly make them at home. i would often make a recipe for rhubarb pineapple jam to go with them. i know i still have that very old recipe somewhere and will be on the hunt for it to send.
 
laughing June 23, 2013
Has anyone tried this recipe (or a similar english muffin recipe) substituting soy milk?
 
icuqt3.14 June 23, 2013
Whoo Hoo! So psyched to try these out: has anyone tried this with gluten-free flour? Yay...these look delish!
 
GardenStater June 23, 2013
Great recipe, and no "English muffin tins" required. I'll definitely be trying this--Thanks!