Bread

No-Knead Sandwich Bread

September 17, 2013

It's always more fun to DIY. Every week, we'll spare you a trip to the grocery store and show you how to make small batches of great foods at home.

Today: Carey Nershi from Reclaiming Provincial shares a recipe for no-knead sandwich bread that takes minimal prep time and makes enough to keep extra dough on hand. Your lunch just got an upgrade.

No-Knead Sandwich Bread from Food52

Shop the Story

Learning how to make bread from scratch is an empowering thing. For me, the ability to transform a seemingly unimpressive list of ingredients into a real, honest-to-goodness loaf of something feels like a revelatory act. Especially since dough holds so many possibilities. The options are endless, and I am a big fan of endless options. 

I have learned that some of the best loaves are the simple, all-purpose ones. I resisted the no-knead revolution for a long time because, well, I liked kneading. But my curiosity eventually got the better of me, and I gave it a try. I was an instant convert. Not only is it easier, but the taste is fantastic.

No-Knead Sandwich Bread from Food52

As my days grew busier and busier, this recipe's minimal hands-on time became ideal. Mixing all my ingredients up in one bowl, letting them hang out and get friendly for an afternoon, then sticking the bowl in the fridge until I’m ready to bake something? Yeah, I’m into that. Saving time by making a double batch? Now we’re talking. If you’re in the habit of making lots of sandwiches (say, for hungry little ones heading off to school!), having a mound of dough at the ready in your fridge can be a lifesaver. 

More: Once you make your first loaf, pack up a PB&J with homemade Concord Grape Jelly.

No-Knead Sandwich Bread from Food52

This recipe is a bit of a meeting-in-the-middle between the Artisan Bread in 5 and Jim Lahey techniques. The flavor of Lahey’s recipe is amazing, but a 12- to 18-hour proofing followed by a 2-hour rise might seem like a daunting amount of waiting time for some. The original Artisan Bread in 5 recipe calls for a fair amount of yeast, which gives the finished loaf a very distinct yeasty flavor. This recipe cuts the yeast in half and compensates by extending the proofing and rise times slightly, allowing more natural flavors to develop without adding a good deal of time to the process. Once the proofing is complete, stick the dough in the fridge for up to two weeks and use it as you need it. (Bonus: the flavor improves over time from the cold fermentation.)

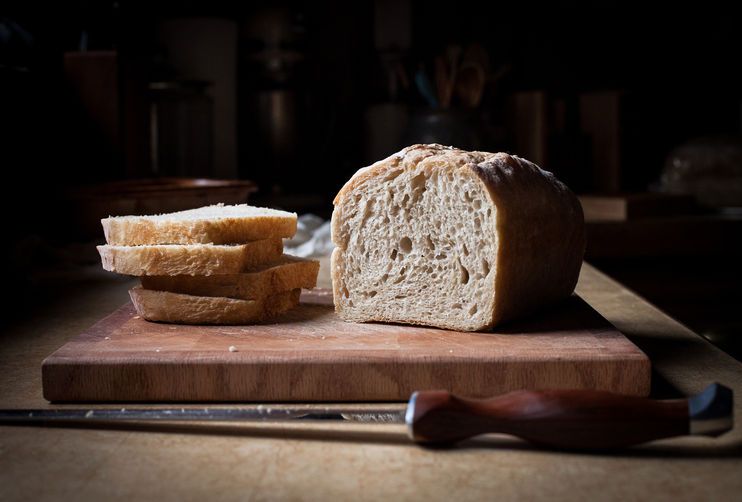
No-knead doughs are usually shaped into round, rustic loaves, but they can easily be turned into fantastic sandwich bread. A teensy bit of kneading and shaping yields a tighter crumb that slices wonderfully, but still begs to be eaten with just a little butter and sea salt -- it’s that good.

No-Knead Sandwich Bread

Makes 2 loaves

3 1/4 cups bread flour (433 grams)
3 1/4 cups all-purpose flour (433 grams)
2 teaspoons instant yeast (4 grams)
1 1/2 tablespoons kosher salt (14 grams)
3 cups of water

No-Knead Sandwich Bread on Food52

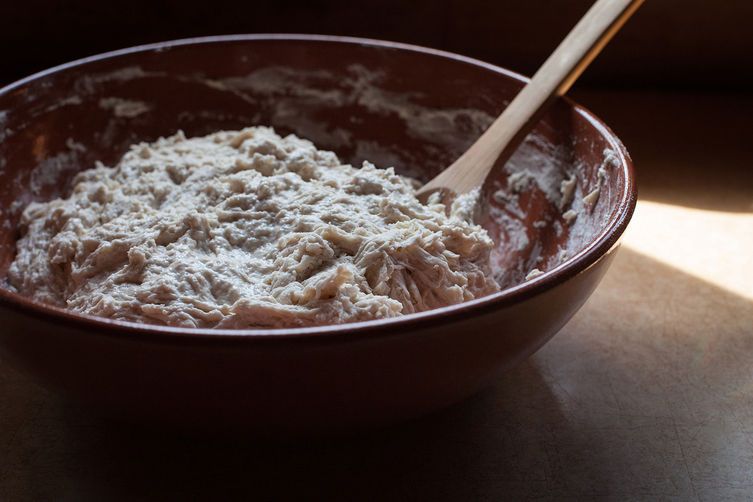
Combine flours, yeast, and salt in a large bowl. Add water and stir together with a wooden spoon to form a shaggy dough.

No-Knead Sandwich Bread on Food52

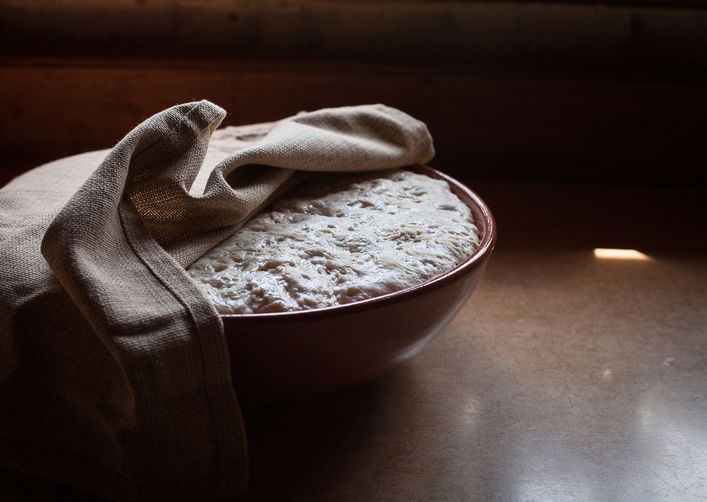
Cover with plastic wrap or a tea towel and let proof at room temperature for around 5 hours. At this point the dough can be used immediately, or covered with plastic wrap and kept in the fridge for up to two weeks.

No-Knead Sandwich Bread on Food52

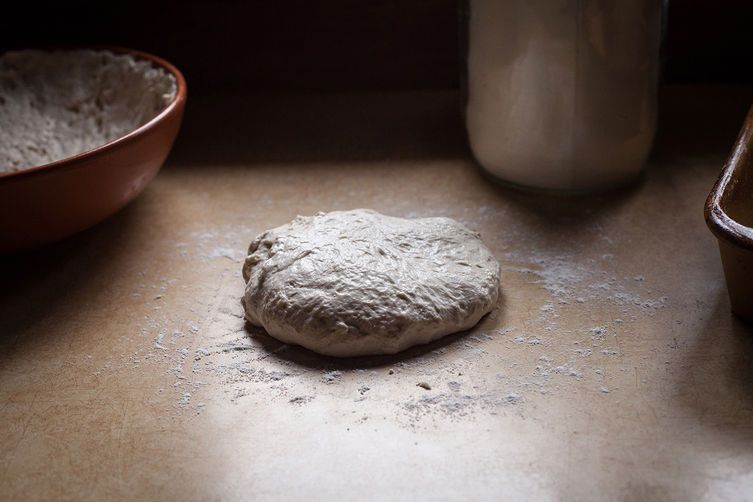
On baking day, remove half of the dough from the bowl and return the remainder to the fridge. Turn the dough out on a floured surface and lightly knead 3 to 4 times.

No-Knead Sandwich Bread on Food52

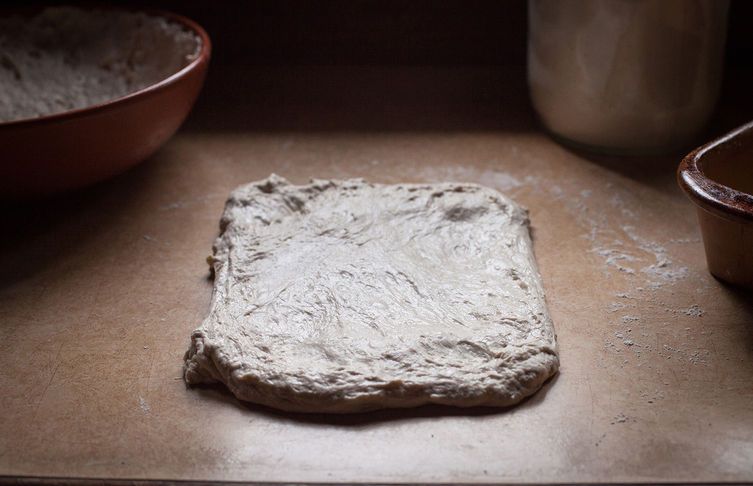
Shape dough into a rectangle, approximately 8 by 12 inches.

No-Knead Sandwich Bread on Food52  No-Knead Sandwich Bread on Food52

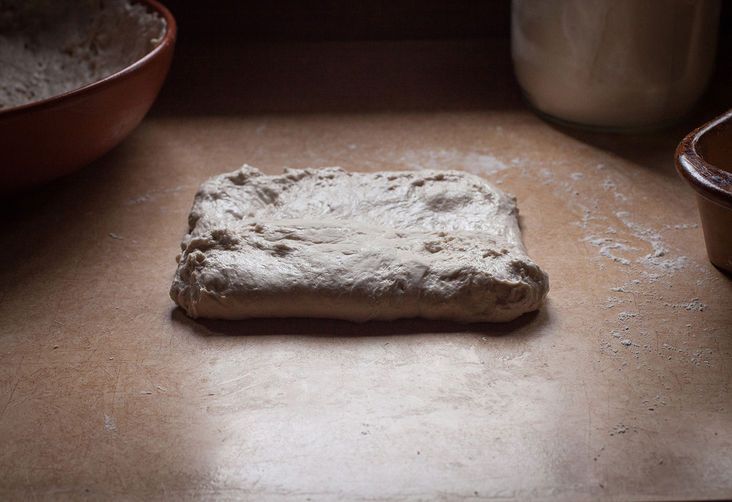
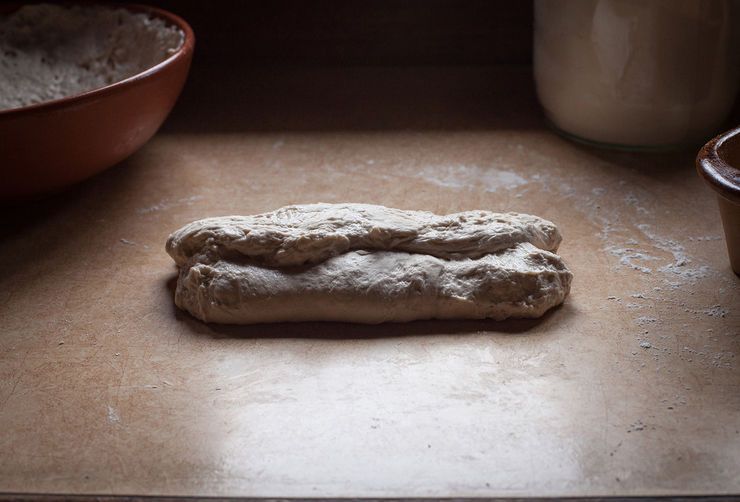
Fold a third of the dough into the center, followed by the other third.

No-Knead Sandwich Bread from Food52

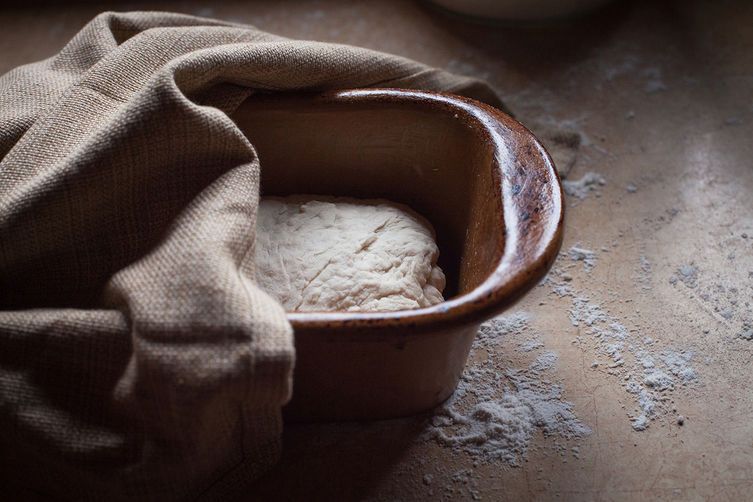
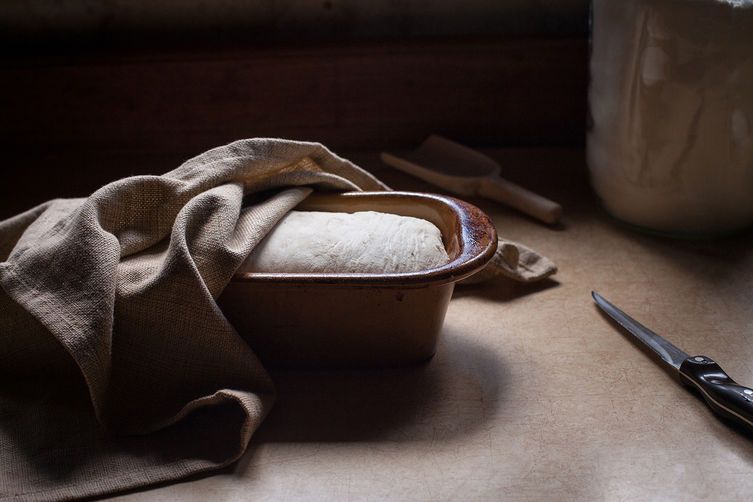
Place dough seam side-down in a buttered loaf pan.

No-Knead Sandwich Bread from Food52

Cover and let rise for around 1 hour, or until the dough has doubled in size. 

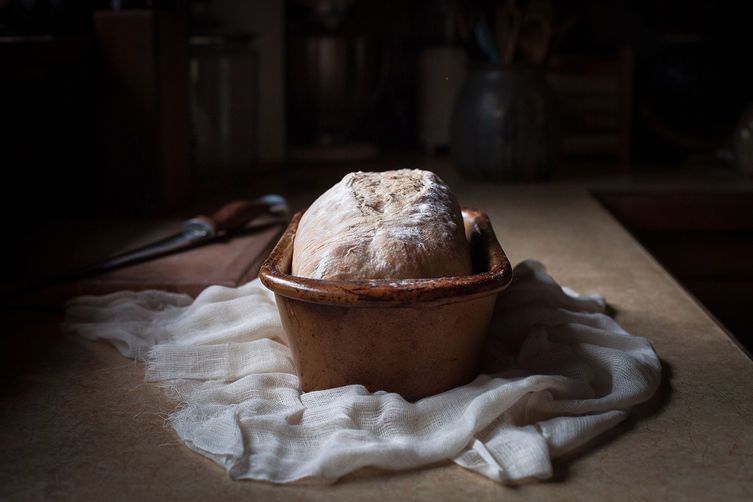
Preheat your oven to 450° F. Dust the top of the dough with a little flour and score with a serrated knife.

No-Knead Sandwich Bread from Food52

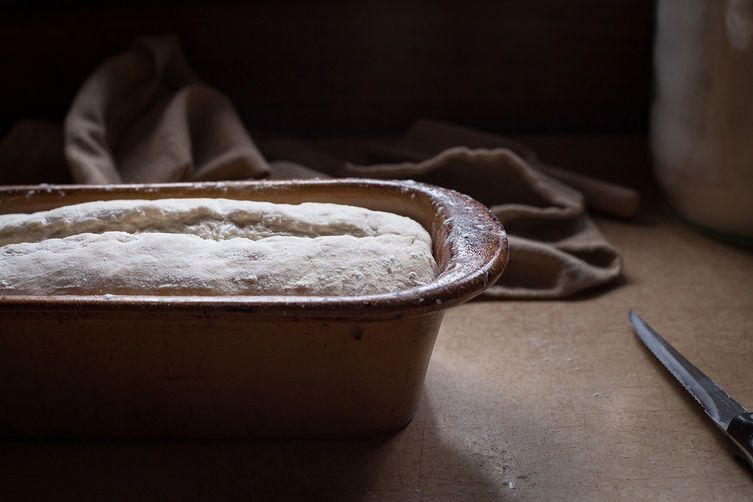
Bake for 30 to 35 minutes, or until the top of the loaf has just begun to brown. Let cool for at least an hour before slicing.

No-Knead Sandwich Bread from Food52

See the full recipe (and save and print it) here.

Photos by Carey Nershi.

Listen Now

Join The Sandwich Universe co-hosts (and longtime BFFs) Molly Baz and Declan Bond as they dive deep into beloved, iconic sandwiches.

Listen Now

See what other Food52 readers are saying.

  • Pete
    Pete
  • Stacy Fletcher
    Stacy Fletcher
  • Donna
    Donna
  • David
    David
  • Dr.Khalsa
    Dr.Khalsa
Lover of simple food and cocktails served with a single giant ice cube. Raised in the NY Schoharie Valley; currently residing in Burlington, VT. Blogger at reclaimingprovincial.com.

79 Comments

Pete November 30, 2018
Will the refrigeration storage process work with bread made from a sourdough starter. If so how long should the proof last before storage. I normally proof (rise) my no-Knead for 12 hours before slight kneading and placing it in a proofing Brotform in which I proof for one additional hour, then into a preheated container and oven.
 
Stacy F. May 12, 2017
Can I use a Pullman loaf pan the regular 9x5" size for this bead? And can I just put it in the fridge overnight and bake it 12 to 18 hrs later (or remove from fridge 12-18 hrs later)?
I wanted to do it before bed to bake in late morning?
 
Donna October 19, 2015
What size loaf pans are used? It doesn't say anywhere in the recipe, and it makes a difference!
 
David October 19, 2015
Hi there: My bags of flour says 1 cup of flour weighs 120 grams (both AP and bread flour). Your recipe has a cup of flour weighing a little over 133 grams. 6 1/2 cups of my flour would weigh 780 grams, 86 grams less than the stated weight in the recipe. That's a pretty big discrepancy. So I'm not sure whether to measure by volume or weight. And if I go by weight, which weight do I use? Thanks.
 
Dr.Khalsa October 19, 2015
When I went to your site initially I was expecting to find having to get expensive baking tools like a bread making machine or somethjng but was impressed with the Simplcity of your approach. Looking forward to using our humongous bags of chapatti flour to see if it might work. Am a real fan of chapattis, especially stuffed ones called prantha! Btw, FFT(food for thought), did u know that the flour from the Punjab in India is the most nutritious wheat in the world? So much so that the Russians back in the day, tried to conquer India just to get their wheat for Russian astronauts!
 
GregoryBPortland October 5, 2015
I wouldn't think so given the absolute necessity to bake these loaves in a Dutch oven with a lid.
 
Deb C. October 5, 2015
Hi just ran across your site. Do you know if the no knead sandwich bread recipe could be baked in a pullman pan?
 
Akiko August 26, 2014
Great recipe! I'm happy to have fresh toast bread in a weekday. We ate almost half for our breakfast going back to kitchen and slicing the bread again and again ... ;)
 
How's I. November 29, 2013
This is without a doubt the best white bread I've ever tried!
 
Kelsey November 6, 2013
I made this bread last night, and the crust is delectable! The bread itself tastes gummy; I don't know whether to attribute this to it not being cooked through or me not being used to eating white bread. I did cook it with a pan underneath the loaf pan and with a bowl of water in the oven. I would love advice on making it less gummy--even if that's just increasing baking time.
 
the T. November 6, 2013
No knead dough is wet enough as it is, just ditch the extra water. Let it rise in the pan (make sure it's made out of the heaviest gauge metal you can find) until it's at least doubled. Stick it in a pre-heated 500º oven and let oven spring do it's magic, take a peek at it after about 15 minutes, if it's looking good and growing a bit turn the heat down to 450º and let it go another half hour..
 
musicalnuke April 17, 2020
if you have a thermometer (like a thermapen), check the internal temp of the loaf to ensure it is done. ~190F for most breads, ~200F for enriched breads (with milk or eggs) and then let them cool. If you cut into a baked bread too soon, you can get that gummy consistency.
 
GregoryBPortland October 27, 2013
Keep making bread. It's one of the most satisfying things you can do in the kitchen.
 
tanvir October 27, 2013
Thank, this is an amazing recipe specially this is my first bread ever. I am so proud of it and smiling away since I made it two weeks ago.
 
GregoryBPortland October 25, 2013
Freeze the other loaf. I know this sounds silly, but the recipe was conceived for two loaves and cutting it in half didn't work. If properly frozen and then thawed when you need it, the loaf will be nearly as good and at the very least will make spectacular toast.
 
Alice G. October 25, 2013
I tried this recently. The only change I began with was to cut the recipe in half(I won't use 2 loaves in 2 weeks) and after the first rise it was WAAAY too wet and sticky. I couldn't get the dough to hold its shape. I wound up working in at least a cup of extra flour and letting it rest for a day. I formed it and baked it alright yesterday, and while it was still delicious, it is too dense for sandwich making. Any suggestions? I used AP flour and Pillsbury Bread flour.
 
TrishR October 16, 2013
I made this over the weekend and it came out truly perfect. So simple, and so delicious. I'm sharing the recipe right and left, because with something this easy and great, we should all have homemade bread during the week! Thank you!
 
jana.swenson.73 September 25, 2013
Is 1 1/2 TBS of salt correct? When I weigh it out, it weighs 29-30 gram, so do you mean 1 1/2 tsp?
 
Carey N. September 25, 2013
Hmmmmmm, it should definitely be 1 1/2 tablespoons, and now I've basically gone down an internet rabbit hole reading about the different weights of kosher salt (depending on how they're made and the resulting density). Apparently they can vary quite a bit! And the origin of the type I'm using is a mystery to me since I buy it from a bulk bin at the store. I looked around to see if I could turn up a kosher salt weight from other ABin5 no-knead posts, but didn't have any luck. In this case, I would suggest going with your 1 1/2 tbsp, even if it's pushing 30 grams. (One of the criticisms I've read of the no-knead bread recipes is that they could use more salt, so I don't think it will hurt.)
 
Rose L. September 24, 2013
bread just out of oven. looks perfect. is there a way of sending a photo?
 
Carey N. September 25, 2013
Oooo! If you're on instagram, you can find me @careynotcarrie. Otherwise you can email me a shot: [email protected]. I'd love to see! :)
 
LauriL September 24, 2013
Nice pics! For a moment I thought they were Eric Moran's who does some free-lancing on What To Eat Now column. See Bagel making!
 
Carey N. September 25, 2013
Thank you! I love Eric's style, so I take that as a big compliment. :)
 
Kim116 September 24, 2013
I read the comments about active dry vs instant yeast but does anyone have experience using fresh yeast for these long proofing recipes?
 
the T. September 24, 2013
I played a bit with it (my mom used to use it). A little goes a long way, according to the Red Star website, you should be able to get 4 loaves out of one cake. Just be aware that it is perishable- and when it goes off it really stinks. http://www.redstaryeast.com/lessons-yeast-baking/yeast-types-usage/cake-fresh-yeast
 
Sini |. July 5, 2014
I almost always substitute dry yeast with fresh yeast as it's very easy to come by where I live and I think that it gives you the best rising results. You need more fresh yeast than dry one: if using fresh yeast, use three times the amount of dry yeast the recipe calls for.
 
Jill M. September 23, 2013
Can someone help me divide this dough to make a single loaf of bread? I'm using some rather expensive heritage AP flour ($10 for 2 lbs) and I don't want to waste it and have my bread turn our horrible. I tried a similar method/recipe by dividing a recipe in half because I didn't want to waste flour and that's exactly what I did. It didn't turn out like I wanted. I was still able to use the bread for toast, but it was pretty dense. I'm not a baker and assume that dividing the recipe isn't quite linear. Is it based on ratios? Also, can I just use AP flour and omit the bread flour? Any tips are appreciated.
 
Carey N. September 24, 2013
I usually split this recipe right down the middle to make a single loaf without issue. (So that would be: 433 grams of flour; 355 grams of water; 4 grams of instant yeast; 7 grams of salt.) Another reader noted that if you do want to use 100% AP flour, you will want to add a little less water or a little more flour, as the lower protein count of AP flour could make the dough a bit sticky as is. I hope this helps!
 
ginam September 23, 2013
If I didn't want it to sit in the fridge till I was ready to bake, would it still work as well? Thanks for this great recipe and idea!
 
Carey N. September 23, 2013
Yup! You can totally bake a loaf right away. The bread does develop wonderful flavor after it's had some cold fermentation time in the fridge, but a loaf baked immediately will still be absolutely delish. :)
 
GregoryBPortland September 23, 2013
The original recipe for Jim Lahey's No-Knead bread recipe called for a little more than three cups of unbleached flour. I decided to experiment with the ratio of regular flour after enjoying Lahey's excellent recipe and found that adding 1/2-cup of whole wheat, while reducing 1/2-cup unbleached flour did not affect the texture of this wonderful bread. It added flavor as well. I'll try this with Ms. Nershi's fine looking recipe but only after I have mastered her version first. BTW, you can substitute your own preference amount of whole wheat flour to the bread recipe, but keep in mind, the loaf twill have a correspondingly wheatier flavor and the loaf will be heavier. My suggestion would be to start with 1/2 cup and,if you like, add by 1/4-cup increments.
 
Kris September 23, 2013
How does this turn out if you use whole wheat (or mostly whole wheat) flour?
 
Carey N. September 23, 2013
I've gone up to half whole wheat, half white flour, and I wouldn't really recommend increasing the whole wheat flour beyond that, as I imagine it'd yield a rather dense bread. If you do give it a go, you'll want to increase the first and second rise time by quite a bit (perhaps by around 50%).
 
tanvir September 22, 2013
Des this freeze well?
 
Carey N. September 23, 2013
I haven't tried to freeze either the dough or the bread, so I'm not quite sure myself. I've seen people talk about freezing Lahey's no-knead pizza dough, but pizza and bread are two different beasts. If you do give it a try, let me know how it works out.
 
CHeeb September 25, 2013
Tanvir,we make five loaves a week for church ,wrap them in foil after baking,and then seal them in gallon zip lock bags.Granted they don't stay around long, but even still warm from the oven, they freeze beautifully.
 
sherrilb September 22, 2013
Do you have any hints about high altitude (6600 ft.)baking?
 
Carey N. September 22, 2013
I don't have much experience with high altitude baking myself (we're only a couple hundred feet above sea level in Burlington, VT!), but KAF has a great little guide to adjustments you should make: http://www.kingarthurflour.com/recipe/high-altitude-baking.html
 
Rose L. September 22, 2013
Better for bread gold medal flour is about equal in protein to King Arthur bread and unbleached all purpose combination.
 
Rose L. September 22, 2013
What kind of flours are you using? The total protein content will determine the amount of water needed.
 
Arrxx September 22, 2013
Let's just call it ALMOST No-knead bread and enjoy it. So many food purists. Call the recipe title police please.
 
Mark September 22, 2013
Why does "No Knead" bread have to be lightly kneaded "3 to 4 times"?
 
Carey N. September 22, 2013
I addressed this below with another commenter, so forgive me, but I will just copy & paste my reply:
The "no-knead" method refers to the technique of allowing gluten to develop naturally through an extended rise time, rather than kneading. And with both the ABin5 and Lahey techniques gaining an immense amount of popularity over the past several years, "No-Knead" has become a label that pays homage to those particular recipes, in addition to the actual literal translation.
 
the T. September 22, 2013
You should knead at least a minute when you start. For your purposes, consider "No Knead" as more of a term of art- true, you don't have to knead for an extended period, but you should at least knead until you have a fairly smooth mass and it's not sticking in your work bowl.
 
Ellie H. September 22, 2013
I have just mixed the dough but it seems VERY dry to me. I have used Jim Lahey's no-knead recipe for years but this is so much drier. Is 3 cups of water really enough?
 
the T. September 22, 2013
i'm afraid that the moisture content of flour will vary just because it's a biological product. that's the great weakness of the no-knead method- flour is measured out by volume when the smart thing to do is measure it out by weight, and then mix according to ratios. i don't have a scale myself- i just add a little extra water whenever i make it and dust a little extra flour on if it needs it. of course i knead my dough for a minute or two. you really need to do that to get a feeling for it.
 
Carey N. September 22, 2013
3 cups has always worked for me, but I do weigh out the flour instead of measuring by volume. I agree with the above comment — add a little more water until the dough looks right to you. (It should look like the shaggy dough you're used to seeing with the Lahey recipe)
 
GregoryBPortland September 22, 2013
As a total convert to the no-knead method, I can't wait to try this. I have been making my own version of Jim Lahey's recipe with the addition of some whole wheat flour for years. These breads are so rustic and artisanal and taste so good. And sadly, good bread is expensive these days. It is so worth doing yourself. Thanks.
 
Carey N. September 22, 2013
So very true. And the store-bought stuff doesn't make your house smell amazing. :)
 
NikkiSnacks September 22, 2013
I'm confused by the light kneading in step 3 of this no-knead bread recipe.
 
Galapagos September 22, 2013
How to do it or its purpose? The purpose is to redistribute the yeast, get rid of the carbon dioxide bubbles, and form dough into a shape to go into the bread pan.
 
Gabriella S. September 22, 2013
I have found that you want to avoid handling the dough by too much kneading as it deflates it, rendering the loaf dense, the folding technique seems to provide natural areas for air in the loaf. Personally I take the dough out of the fridge and bring it back to from temp for circa 2hrs.. Then I shape the loaves. The dough is that more pliable when it is not stone cold. In the time it takes for my convection to heat and then heat the tiles for 0 min, the loaves rise enough. you MUST slash to llow the loaves to "bloom" once the oven heat hits the dough.The authors of the technique have YouTube and step by step pictorial PDFs available. I used these before making an investment in their book. Type "5-min artisan bread" and you'll find lots of help with the knead or shaping of the bread. Also to get a good crust, which my family highly prefers, I add water to the oven after putting the loaves onto my preheated (30 min) baking tiles. (Once again, the authors explain that too). Hope this helps.
 
NikkiSnacks September 22, 2013
Neither. It's called a no-knead bread, but you still have to knead it. I was being facetious. The folding, I get. I tried to skip the kneading and yes, the loaves were dense and unpleasant.
 
Carey N. September 22, 2013
Thank you for the stepping in with a detailed explanation, Gariella. Nikki, I understand that you're being facetious (and why), but I think the name is still appropriate as the "no-knead" method refers to the technique of allowing gluten to develop naturally through an extended rise time, rather than kneading. And with both the ABin5 and Lahey techniques gaining an immense amount of popularity over the past several years, "No-Knead" has become a label that pays homage to those particular recipes, in addition to the actual literal translation.
 
Gabriella S. September 22, 2013
I make bread using the 5 min artisan bread techniques at least twice a week- I bake off three baguettes at a time ( simply b/c I don't have time for the rise and oven preheating for 1 baguette at a time.
An excellent modification I have found is to substitute no more than 1 cup of the 6 1/2 used in the recipe with wheat bran. It adds fibre and taste without altering the chemistry.. I live in Canada where I use all-purpose (akin to your bread flour- Cdn flour is typically made of harder wheat with higher gluten content.
Another taste variation I have made for my last 4 batches has been superb ( give it a try): add 2-3 tbsp of dry onion flakes, 1tbsp of "herbes de Provence" and strangely, 1tbsp of caraway. Trust me, the taste is great.
 
Babs September 22, 2013
Gabriella I make this regularly as well and make the baguettes at a time as well. Often I will do a round artisan loaf. Occasionally I add stuff to it . Olives, herbs, cheese. etc.

Made this to go with a tri tip roast I made for a cooking club dinner. I sliced the baguettes in half and grilled them with some olive oil. OMG it was fabulous. Sliced the roast and made little sandwiches. Crowd loved it. The bread was the highlight
 
Carey N. September 22, 2013
Thank you for the tips, Gabriella! I love mixing herbs into the dough sometimes, but I have not used onion flakes or caraway (and I can't believe the latter never occurred to me, since I adore the flavor). I will have to give this a try sometime, along with the wheat bran substitution.
 
Gabriella S. September 22, 2013
BTW, two things I purchased to help with bread making that I highly recommend to those of you making bread and pizzas(and I don't sell them or know the companies that manufacture them !)
1. Pizza peel recommended by Cooks Illustrated, EXO Super Peel Pizza Peel, that has a cloth wrapping the peel. It is a clever design that makes the transfer of delicate risen loaves onto hot clay baking tiles safe and less precarious (also less messy avoiding spillage of flour/cornmeal and the like in your oven). A bit pricey but worth every penny. I use mine 2-3 times a week and don't worry about inadvertently burning myself, or deflating uncooked loaves. I transfer 3 baguettes at a time easily. Also purchased for my mom, and she loves hers as well. I made a cover for it with a pillow case and hang it on the wall of my pantry on a 3M Contact Hook (don't I sound like a marketer's pet? Good Grief). The website is:
http://www.amazon.com/EXO-Super-Pizza-Solid-White/dp/B001T6OVPO/ref=sr_1_1?ie=UTF8&qid=1379887693&sr=8-1&keywords=pizza+peel+cooks+illustrated

The other item I recommend is a set of six 6" x 6" baking tiles. They are thick, can truly take high temperatures like those in a pizza oven, can be assembled in a 2, 4, or 6 tile combos for any oven, and best of all can be stored easily in your kitchen. My Pampered Chef stone was much thinner and eventually cracked at these temperatures (as PC warns, it should not be used above 400 degrees F). I got a good run out of my PC stone that had long been unused, but one day, it just cracked in half. When I was looking at buying a proper baking stone to fit my oven, I realized I would not likely use it if its size made it inconvenient or unwieldy to handle. These 6 tiles are easy to store and pull out when needed. I just dust off the cornmeal/flour after cooled and store in a rubbermaid box in a bottom cupboard. Of course you can just leave them in your oven all the time.
The website:
Kitchen Supply Old Stone Oven Baking Tiles, Set of 6
 
amysarah September 18, 2013
Thanks for this - I've baked a fair amount of bread, but am far from an expert. I usually wonder if the dough is doing what, and looks how, it should at the various stages, so I really appreciate the clarity here (and pix!) Also, knowing it can be held in the fridge so long is so helpful - I've often not even started a batch, because my schedule looked sketchy. Doing this today!
 
Carey N. September 18, 2013
Yay! I totally know what you mean about the step-by-step pictures too. I was always so thankful for them when I started working with anything bread/dough-related. I hope you enjoy it!
 
Panfusine September 17, 2013
Literally an answer to my prayers, Love this recipe, thanks so much!
 
Carey N. September 18, 2013
Woohoo! You are most welcome. :)
 
walkie74 September 17, 2013
does the yeast have to be instant?
 
Carey N. September 17, 2013
You can use active dry yeast, but you will want to dissolve it in a bit of lukewarm water first before adding it to the flour. Also, instant yeast typically produces more live yeast cells once it's activated, which allows you to use a small amount in comparison to active dry. If you'd like to sub in the latter, I'd recommend at least doubling the amount to 4 tsp.
 
ashley's B. September 18, 2013
I made up the dough earlier today. I only have active dry yeast (ADY), so I used 4 tsp. I think that's too much! The dough tripled in size in an hour and a half! (My kitchen isn't that warm.) I did dissolve the yeast in 2c. warm water (90 degrees F) and let it sit while I got the other ingredients out and weighed. Next time I'll try 3 tsp.
 
Carey N. September 18, 2013
YIKES. Ok, so this sent me on a quest to read more about instant vs. active dry yeast (because I've actually read in some places that you need to up to triple the amount, which just sounded insane — double seemed tame by comparison!). I found a King Arthur Flour FAQ that noted that you up the amount of active dry yeast when you want something to rise quickly. But when you're doing a longer proofing (like this bread requires), you can actually reduce the ratio to 1:1. (It seems instant yeast is just quicker to get working, but active dry catches up after a little bit.) I'm updating the recipe to note that they will work interchangeably! Also, your dough should be OK, despite all the yeast-y magic that's going on (doubling the yeast actually brings it close to the original Artisan Bread in 5 recipe). You'll just need to let it rise for less time when you're ready to bake. Thanks so much for the feedback, Ashley! :)
 
ashley's B. September 18, 2013
That's great info to know about the ADY vs. instant, and how they are about equal with the longer time. Thanks for researching that and sharing, Carey.
I just put the dough into the fridge when I returned at 1.5 hours. I didn't want it to over-proof and collapse. I thought that would likely slow down the yeast. We'll see what happens.
This recipe make 'mistakes' no big deal: you've not wasted much effort and the ingredients are cheap.
But I'm glad to hear that it's still likely to be good!
 
walkie74 September 19, 2013
Thank you, ladies. Mine still looks like a rock at the moment, but then again, it's only been an hour and I only used 2 tsp. of ADY. More time to clean up around here!
 
the T. September 17, 2013
You might want to add a little fat to the mix to help the crumb stay tender longer. I've also found that I get a better lift if I'm folding *and* stretching the dough. You might want to let it rise at least couple hours before you stick it in the oven, too.
 
Carey N. September 17, 2013
Thanks for the tips! The fat is a great way to maintain the tenderness, though these loaves almost always vanish in my house before staleness has a chance to set in. :)
 
sbf-ct September 17, 2013
Will this work just as well with wheat flour? And can I use regular old flours... or do I need to get bread flour specifically? Thanks! Sounds awesome!
 
Marian B. September 17, 2013
Ditto -- I'd love to try this with whole wheat flour or other whole grain flours (rye, etc).
 
the T. September 17, 2013
I personally prefer bread flour- don't get anything softer than all-purpose. You really need the extra gluten to get a good rise. And if you are going to use whole wheat, use at most 1 part whole wheat to 3 parts bread flour, since the bran in whole wheat flour inhibits gluten formation.
 
Carey N. September 17, 2013
Good question! (I actually meant to make a note about alternative flours in the recipe, so thank you for reminding me.) I've used regular all-purpose flour before and it came out quite nicely too. And I've actually gone up to 1 part whole wheat to 1 part white flour and thought it worked quite well. (It will be a wee bit denser, but it has that yummy whole wheat taste as a trade off.) I haven't experimented with flours like rye and spelt myself, but I've read about others successfully using them in no-knead recipes. (If you'd like to try those, I'd recommend starting with a smaller amount, like the 1 part alternative flour to 3 parts bread flour mentioned above and seeing how it works, then upping it the next time if you think it could use more.) Overall, if you use whole wheat or any other flour besides bread/all-purpose, I suggest giving the dough a bit more time to develop at the proofing stage, and again at the rise.
 
Marian B. September 18, 2013
Thanks!
 
rainey September 17, 2013
I have adapted Lahey's method too. My approach is to use my favorite levain-based recipe for a country loaf and bake it in the closed container preheated to an incendiary temperature.

There was really nothing lacking in the recipe I had but using that enclosed baking environment really did something wonderful to the crust.
 
Carey N. September 17, 2013
Yes! The steam that comes from the closed container method definitely does wonders for developing a lovely, super-crusty crust. A must for rustic loaves. :)
 
HalfPint September 17, 2013
Am going to Love this. Thank you for the weight measurements!
 
Carey N. September 17, 2013
You are welcome! Weight measurements make things so much more precise. :)