Holiday
An Endlessly Riff-able Wreath Recipe—Plus, 8 More Ideas
For harvest time, holiday time, and anytime.
![]()
If your idea of a wreath is that it's reserved for the holidays, let's get this straight: Wreaths are not just for Christmas. The beauty of wreaths is that they're an anytime favorite—with the right foliage and appropriate materials, they work all year round—in fact, you could consider them the never-fade version of a bouquet. They're a beautiful way to decorate your door (actually, they're the only way we know, besides a transformative coat of paint, of course) or even your walls; they last for months, even years depending on the materials you use; they’re hands-down one of the most creative gifts you could give a host; and you can make them at home—yes, even those among you that are short on time (and long on DIY phobia).
To help us along this creative endeavor we read up, watched video tutorials, consulted the experts, and put together the best (and simplest) possible step-by-step guide to making a wreath. Just remember, the process is the same no matter the style of wreath, or season.
Not this time? Well, you can always buy a wreath made from rosemary, magnolia leaves, natural grasses or in our shop.
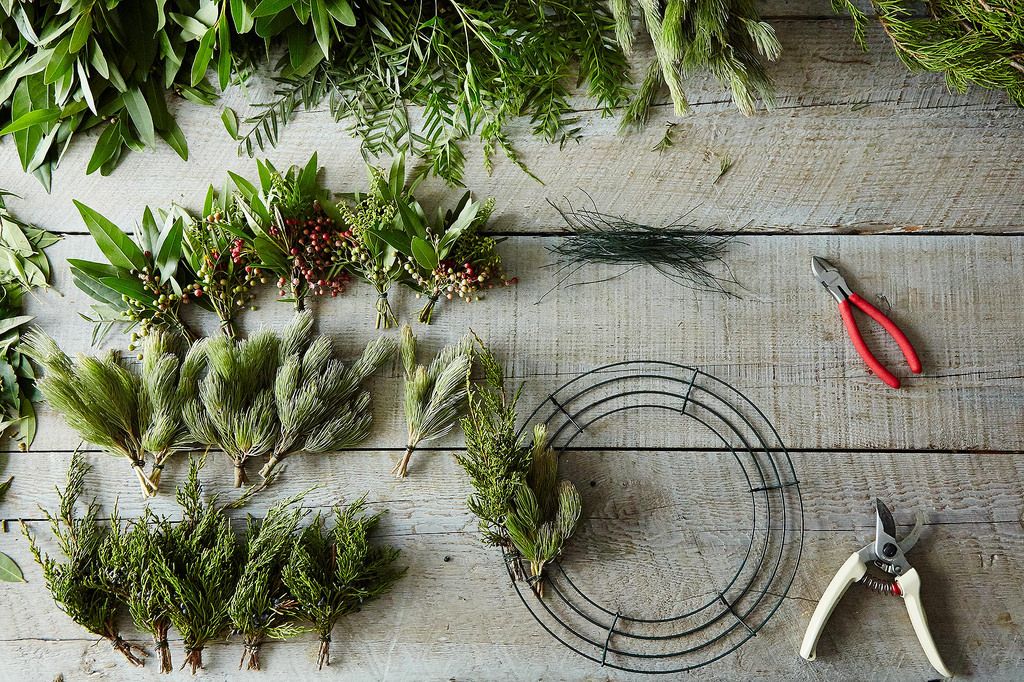
Onto the wreath you've now committed to making—you’ll need the following:
- We have found that a metal wire frame is the most versatile support for wreaths (we used a 12-inch round form here but go with whatever size suits you can find them online and at most craft stores)
- 22-gauge floral wire, cut into 5-inch strips
- Floral shears, like this one
- Wire cutter (use something sturdier than your floral shears)
- 3 different types of greenery (for example you could pick 2 types of evergreen, like redwood, douglas fir, or pine, and 1 type of a more delicate greenery like bay leaves, holly, magnolia, herbs, or seasonal flowers)
- Ribbon or twine for hanging
Here's how it's done:
1. Lay out your greens, grouping them by type.

Unless you want to be sweeping up holly spring for days on end, it's probably best to do this outdoors—or spread out some newspaper indoors.
Make 6 bunches of each type of greenery (for a total of 18 bunches). To make each bunch, cut 4 to 5 pieces of the greenery using your floral shears (good, sharp shears will be your very best friend here). The pieces should be about 5 to 7 inches long.
2. Begin attaching the bunches—one by one—to your wire frame.


Attach each bunch to your wire frame with the 5-inch pieces of wire, winding around each stem a few times to ensure it's secure. Make sure each bunch overlaps with the previous, to cover the stems. Spin the wreath as you add on more bunches, working in a counter-clockwise fashion until you come full circle.

3. Take a look.
Once your wreath is complete, check for any gaps and adjust as needed. Depending on how polished you want your wreath to look, cut off any excess stems or foliage; the end result should have nicely landscaped curves around the outside. For the purpose of hanging, create a floral wire loop and secure it to the back of your form, or you can use ribbon to create a loop. Keep in mind that a wreath is delicate, so if you're planning to gift yours, make sure it's carefully secured in a box when you transport it.

A few more tips:
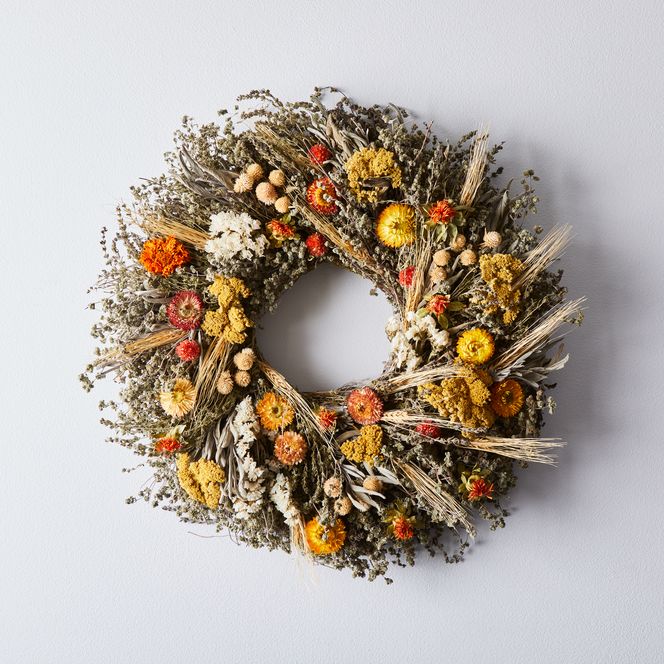
- If you include flowers, pick varieties that are easier for drying and that hold their shape—a dried wreath can last up to a year, and we're all for longevity when it comes to decorating. Hydrangeas and peonies both work beautifully, as do most herbs.
- Don't feel overwhelmed by the thought of working with many ingredients, and finding ways to combine them. A wreath with a single type of greenery looks just as beautiful.
- When you begin layering, pay attention to covering the stems of each bunch. You want the finished wreath to look less twiggy, and more full and lush.
- For extra credit, weave eucalyptus or lavender into your wreath for a fragrant scent that will last for months. It's prettier and more creative than a scented candle (and lasts longer too!).
Ready to get your wreath on? Here are eight more ideas to get you inspired:
1. Non-Traditional Shape
Who ever said a wreath had to be circular? Not us. This sweet n’ simple wall hanging would look just as cozy with fall branches, spring florals, or sweeping pieces of pine.
2. Hula Hooping
A wreath made from a hula hoop? Yes, that’s correct. This bigger-than-Christmas wreath begins with a hula hoop sprayed with metallic paint, and gets layers of leaves and florals to create a familiar asymmetrical shape on a much larger scale.
3. Fluffy & Festive
While the white pom poms resemble fresh snow, truly any color yarn will work here. The hardest thing about making this wreath (or a version of it) is having the patience to make all the pom poms. That said, what could be more therapeutic than turning on some music or a favorite show and settling back on the couch for a night of yarn crafting? Pretty much nothing.
4. A Last-Forever Kind of Wreath
Since this one is made from dried florals (any kind of dried or preserved branches work here), it will last far longer than any cut pine ever would. It’s a good thing, too, since this works for any season.
5. Twig Base
Instead of a pre-shaped wire wreath base, this little guy relies on gently bent branches to serve as a… branching off point. Sincerest apologies. Anyway! The green velvet, pine sprigs, and bronze bells bring a decidedly holiday vibe, but the branch base would look just as lovely with dried florals or eucalyptus.
6. When Life Gives You Weeds
This genius wreath makes use of an ever-annoying weed, flowering plantain (often found pushing through sidewalk cracks), and turns it into something stunningly rustic. As it turns out, even weeds look elegant when dried.
7. Shaker-Style Peg Wreath
The fact of the matter is: wreaths can be made from virtually anything. This one consists of Shaker-style wooden pegs glued around a circular frame, and the finished product would fit into tons of decor styles, from modern to rustic.
8. Cotton Branches
The crafting concept of this cotton wreath is really very similar to any simple wreath form: just wrap the branches around the base and secure with wire.
This article was updated in November 2020 to add even more ideas.
Which wreath are you most inclined to make this year? Tell us in the comments!
Photos by James Ransom

Choose your holiday adventure! Our Automagic Menu Maker is here to help.
View MakerWritten by: Posie (Harwood) Brien
Popular on Food52
6 Comments
Simple and easy instruction ...... really appreciate your wonderful site.
See what other Food52 readers are saying.