DIY Food

Maple Meringue Filled Doughnuts

by:
April 11, 2012

Every week, a DIY expert spares us a trip to the grocery store and shows us how to make small batches of great foods at home.

Today, Lara Ferroni gives us a fool-proof method for making yeasted doughnuts and a meringue filling to complement them -- see her gorgeous step by step photos below.
Lara is the author of Doughnuts: Simple and Delicious Recipes to Make at Home, and the forthcoming book, Real Snacks: Make Your Favorite Childhood Treats Without All the Junk.

I don't know about you, but deep frying isn't one of those things I have always felt comfortable with. I have secret fears of pops of scalding oil in my eye or somehow burning down the house. I fret with how to get rid of all that oil when I'm done with my frying, and how to keep my house from smelling like I live in a fried chicken joint. I know I'm not alone, because of the scores of baked mini doughnut recipes available on the web now. These cute little rings have a certain charm and and I can promise you when presented with a plateful, I certainly wouldn't turn up my nose at one or six. But really, baked cake doughnuts do not calm my jonesing for a real doughnut any more than a muffin will satisfy my craving a cupcake. There are times when you just need to indulge in the real thing.

After making dozens upon dozens of doughnuts for my first cookbook, I pretty much have gotten over those initial frying fears. I've learned that with careful temperature monitoring of the oil and a well working vent fan, my whole house doesn't end up smelling like a fryer at the end of the batch. And, unlike working with hot sugar, I've never burned myself with hot oil. Not once!

And so, when the craving comes as it does every now and then I make a small batch of fried yeasted doughnuts. These doughnuts need a little bit of time, but are pretty foolproof. Lofted by yeast, they puff up beautifully creating a perfect "proof" line around the middle. A little bit of whole wheat flour makes for a more complex tasting pastry without sacrificing the lightness of the dough... but feel free to substitute the whole wheat flour with more bread flour if you choose. However, do use bread flour rather than all purpose flour for these doughnuts, or your texture won't be nearly as light and fluffy.

Shop the Story

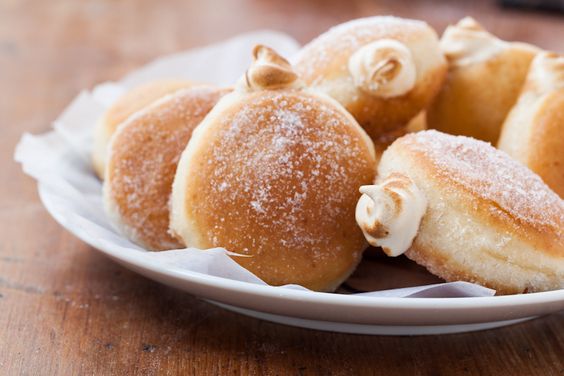
This batch, punched out a bit smaller than your typical filled doughnut, I've filled with a creamy and subtly sweet maple meringue.


Raised Doughnuts:

Makes 12 Smallish Filled Doughnuts

2 teaspoons active dry yeast
1/2 cup whole milk, heated to 110F
1 to 1 1/4 cup bread flour (120 to 150 grams)
1/4 cup whole wheat flour (30 grams)
1/2 teaspoon vanilla extract
1 large egg
1 tablespoon cane sugar
1/4 teaspoon salt
2 tablespoons unsalted butter
1 liter safflower oil


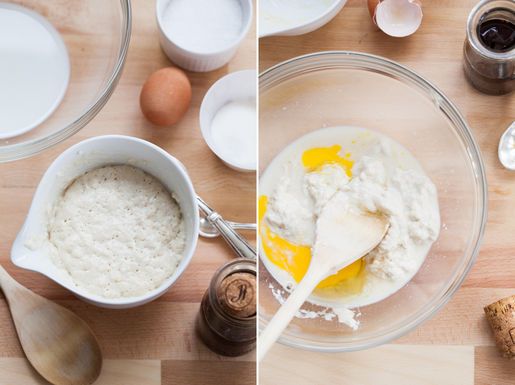
1. In a medium bowl, dissolve 1 teaspoon of the yeast into 1/4 cup of the milk. Add 1/4 cup of the flour and stir to create a smooth paste. Cover and let rest in a warm spot for 30 minutes.

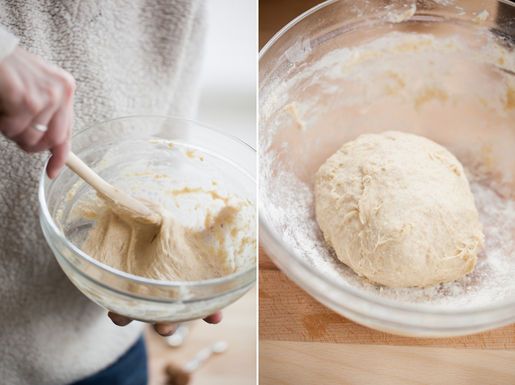
2. Combine the remaining milk and yeast in a medium sized bowl. If you have a stand mixer, you can use it, but I made this batch with a wooden spoon and a bit of good old fashioned stirring. Add the rested flour mixture along with the vanilla and egg. Stir until smooth. Add the whole wheat flour plus 1/4 cup of the bread flour. Top with the sugar and salt and vigorously stir until the dough starts to come together. Add the butter and continue to stir, adding flour about 1/8 cup at a time, until the dough starts to form into a ball. Then, with a dough hook if you are using a mixer or with your hands, knead in the remaining flour a little at a time until the dough is somewhat smooth and only a little sticky. You may have a little flour left over... just save it for when you roll out your dough.

3. Cover the bowl with plastic wrap and let it sit in a warm place for 30 minutes. Gently push down the dough, recover, and refrigerate for at least 1 hour (and up to 12 hours). This will help stiffen the dough a little and make it easier to roll and cut out.

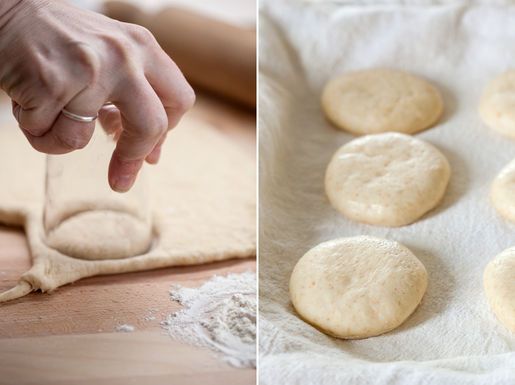
4. Line a baking sheet with a lightly floured non-terry dish towel. Roll out the dough on a lightly floured surface to 1/2 inch thick. With a doughnut or cookie cutter, cut out 2-inch-diameter rounds (or, if you want, you can make traditional doughnut shapes with this dough and skip the filling).


5. Place the doughnuts on the cloth lined baking sheet at least 1 inch apart and cover with plastic wrap. Let sit in a warm spot to proof until they almost double in size, about 30 to 40 minutes, testing at five-minute intervals. To test whether the dough is ready, touch lightly with a fingertip. If it springs back immediately, it needs more time. If it springs back slowly, it is ready. If it doesn’t spring back at all, it has over-proofed; you can punch it down and re-roll it once.

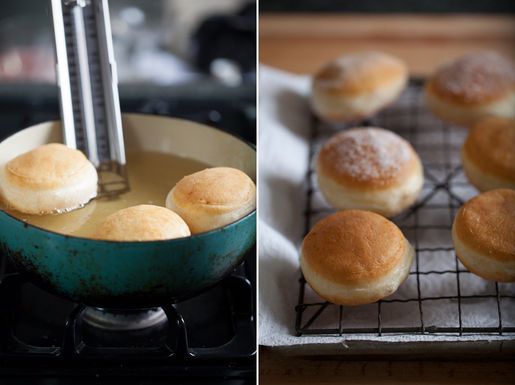
6. When the doughnuts are almost done proofing, heat a heavy-bottomed pot with at least 2 inches of oil until a deep-fat thermometer registers 365?F. With a metal spatula, carefully lift the proofed doughnuts and place them in the oil. Fry for 1 to 2 minutes per side, or until light golden brown. Remove with a slotted spoon, drain on a wire rack over a paper towel.

7. It's important to let your doughnuts cool all the way before filling, but if you want your doughnuts sugar coated, dip them in a shallow bowl of granulated sugar while they are still slightly warm to the touch. Superfine bakers sugar works the best for this. If you want your doughnuts powdered sugar dusted, wait for them to cool before shaking on the powdered sugar.

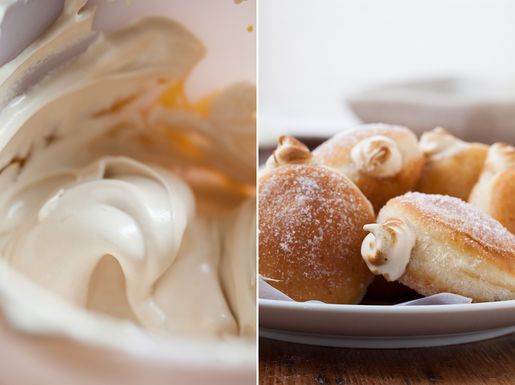
8. These doughnuts become almost completely hollow when fried without a hole punched in the center, so they are really easy to fill. Lightly hold the doughnut from the bottom, cradling the sides with your fingers, and gently insert the piping bag tip. If the doughnut isn't hollow for some reason, you can clear a space with a chopstick... and then simply squeeze your piping bag, slowly withdrawing it as you fill. I like a little dollop of filling to come out the top so you can see what is inside. If you fill with meringue, use a kitchen torch to lightly brown the meringue.

Maple Meringue Filling:

1 cup maple syrup (A or B)
2 large egg whites
1/4 teaspoon cream of tartar
1 pinch kosher salt


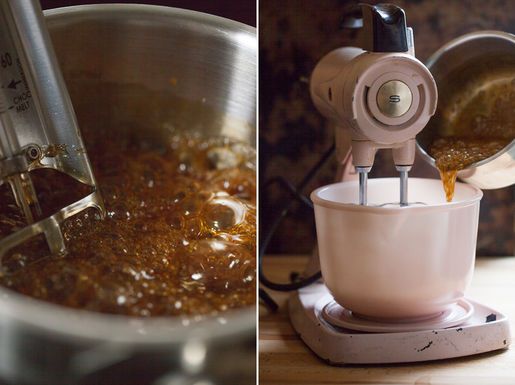
1. Put the maple syrup in a 1 quart heavy bottom pot with a candy thermometer attached. Heat over medium until the syrup comes to 235F. The syrup will bubble pretty fiercely, so keep an eye on it so it doesn't bubble over. Also, be careful not to overheat or you'll end up with maple candy.

2. When the syrup gets up around 220F, place the egg whites in the bowl of a mixer with the cream of tartar and the salt and mix until just frothy. Then, increase the speed and beat until the whites can hold a stiff peak.

3. When the syrup has come to temperature, turn the mixer back on medium speed and slowly stream in the hot syrup, continuing to beat until the meringue is thick and a bit shiny, about 2 minutes.


4. Transfer the meringue to a piping bag. If you have a long berliner tip for your piping bag, this is the easiest, but a standard 1/4 inch star tip will work well too. Then, fill as directed in the doughnut recipe.

Save and print the recipe here.


See what other Food52 readers are saying.

  • Bigdough70
    Bigdough70
  • Kitchen Butterfly
    Kitchen Butterfly
  • midnitechef
    midnitechef
  • sunflourbaking
    sunflourbaking
  • Robin Brown
    Robin Brown
Lara Ferroni is a former tech geek turned food geek who spends her days exploring the food culture of the Pacific Northwest. As a writer and photographer, you might spy her digging through bargain bins for the perfect prop, or dreaming up delicious new ways to use teff, or eating and drinking her way through Portland's vibrant food culture. Her photos have been featured in websites and magazines such as Epicurious and Edible Communities, as well as over 10 cookbooks, including her own, Doughnuts (Sasquatch Books) and Real Snacks: Your Favorite Childhood Treats Without all the Junk (Sasquatch Books), as well as a food photography how-to book, Food Photography: Pro Secrets for Styling, Lighting & Shooting (Pixiq). You can find more of her tasty photos and recipes on her blogs, CookandEat.com and StillLifeWith.com.

19 Comments

Bigdough70 November 17, 2020
I have been trying to make yeast donuts at home and made over 20 different batches but seem to get the same problem that the donuts go hard quite quickly, is there anything I can add to the dough to make it last 24 hours after frying?
Thanks
 
Kitchen B. April 22, 2012
I'm a heroine....because of you. We had these for breakfast and though they didn't look as GORGEOUS as yours they were doughnuts in every way. I tossed some in sugar and the others I stuffed with storebought strawberry jam , mixed with a pinch of freshly ground cardamom! HEAVEN. We all enjoyed coffee with them - my nieces and kids and my lil sister. MY only regret? Being cautious and making one batch! My next batch will feature both vanilla custard and lemon curd custard! Thank you again.
 
Lara April 26, 2012
Yay! So glad to hear you enjoyed them! Strawberry & cardamom sounds so lovely!

Lara
 
midnitechef April 16, 2012
Yum! I can almost taste them... I might make a lemon meringue.
 
sunflourbaking April 15, 2012
Is the butter melted or softened?
 
Anna H. April 16, 2012
I think slightly-softened room temperature butter works well!
 
Robin B. April 15, 2012
These look quite delicious....I wonder if it can be adapted to Gluten Free? Might have to experiment!
 
Lara April 26, 2012
Hi Robin - I have a GF raised recipe in my cookbook, and they are quite good... however, I haven't found a great flour combination yet to get the same fluffy texture as these raised doughnuts. You might give it a try with some of the newer mixes though, like the Keller cup4cup... there have been a lot of advancements in GF all purpose mixes since I wrote my book!

Lara
 
Kitchen B. April 12, 2012
They look fantastic. We've been meaning to try donuts at home.....hmmmm. Thanks Lara and I love your photography!
 
mcs3000 April 12, 2012
Dying to make these. Reminds me I need to buy your book. Loved your book video trailer. Btw: i think you took the masthead photo on one of my very favorite blogs: Megan Gordon's "A Sweet Spoonful."
 
homemadecravings April 11, 2012
I am making these right now so we can fry them up in the morning - but question - Ingredients say 1 egg and directions says add vanilla and egg yolks....Egg or Yolks? More than one yolk?
 
homemadecravings April 11, 2012
Thanks!
 
Lara April 11, 2012
Hi - Sorry about that. It is a full egg, not just the yolk.

Lara
 
Lara April 11, 2012
BTW - I've updated the recipe, but it hasn't updated this post yet. When I was editing that, I realize that the line about the butter went missing as well. The butter should be added after the sugar and salt. Thanks again for the catch!!

Lara
 
Lara April 11, 2012
BTW - I've updated the recipe, but it hasn't updated this post yet. When I was editing that, I realize that the line about the butter went missing as well. The butter should be added after the sugar and salt. Thanks again for the catch!!

Lara
 
homemadecravings April 11, 2012
Thank you! I took a guess and made it with the 1 egg and the butter, frying tomorrow!
 
Anna H. April 12, 2012
The butter and the egg directions have been updated in both the post and the recipe! Happy doughnut-making, everyone!
 
duclosbe1 April 11, 2012
Oh, goodness. These look absolutely amazing! Thank you so much for sharing this recipe. Those step by step photos are so helpful! Deep frying makes me anxious as well, but I cannot wait to try these.
 
Becky A. April 11, 2012
I posted donuts today as well!! Your sound truly divine. One can never have enough donuts, or at least I can't!