


4 interest-free payments of $57 with Affirm. Learn more
Additional promotions do not apply to this item.
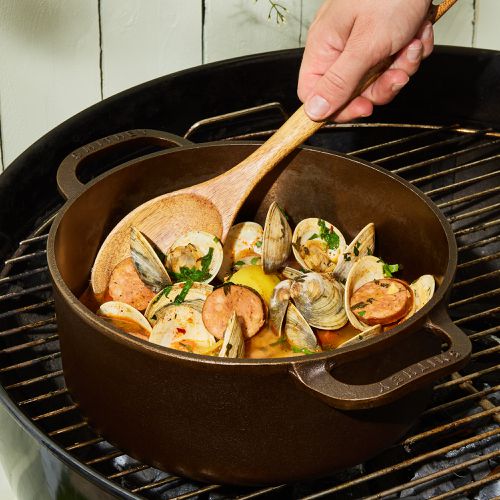
Let's go Dutch
Meet the Dutch oven of our dreams, built for soup, braised meat, one-pot pasta, no-knead bread, you name it. It’s cast iron, so it provides even heat distribution, keeps food warmer for longer, and won’t crack or chip. Then there’s the polished interior, which develops a slick patina with time.
- Compatible with all cooktops, including induction
- Oven safe
- Handwash only—do not soak in water
- Cast iron delivers superior heat distribution and retention
- Pre-seasoned and will blacken as seasoning matures
- Oil from regular cooking helps keep it seasoned
- Lid also fits Smithey’s 10-inch skillet
- Made by craftspeople in South Carolina
- Made in: Charleston, SC
- Shipping & Returns: Free Standard Shipping on Orders $199+ ($14.99 on Orders Below $199) and Easy-Breezy Returns.
3.50 QT dutch oven measures 9.00" in diameter (13.25" L with handles) x 4.50" H; weighs 13 pounds.
5.50 QT dutch oven measures 10.00" in diameter (13.25" L with handles) x 7.50" H; weighs 14 pounds.
5.50 QT Dutch oven lid fits 10" Smithey skillet.
- Materials:
Cast iron
- Care:
Dutch oven is pre-seasoned, but should be seasoned at user's leisure. For best results, use regularly as the oil from cooking helps to keep the cast iron seasoned.
Note that newer dutch ovens may appear more golden brown in color, but will darken with use and seasoning.
Compatible with all cooktops (electric, gas, and induction) and oven safe. To clean, scrub lightly with warm water. For stubborn food remnants, use a touch of dish soap and a nylon scouring pad. Always thoroughly dry dutch oven after each use, apply a light layer of vegetable oil with a towel, and store. Never put dutch oven in the dishwasher. Do not soak in water.
Seasoning Tips:
Seasoning coming off is normal while you are breaking in a polished cast iron skillet. Your Smithey arrives with 2-3 light layers of seasoning to protect your cookware in transit.
The second part of the seasoning process is done at home and will improve over time. During this transition period the dutch oven’s performance won’t be affected, however. Just be sure to dry your dutch oven and apply a light layer of oil after each use to keep building up your seasoning. It will completely blacken over time, which is the sign of a mature seasoning.
One method to accelerate the seasoning process is called the stovetop method. Steps below:
i) On your range, bring the dutch oven to a scorching temperature and intermittently rub light layers of shortening or vegetable oil over the cook surface with a paper towel in succession. Be careful because the dutch oven is hot. This will create a lot of smoke, so be sure to turn on a vent or hood.
ii) After 5-10 minutes of applying oil to the surface at a scorching temp, the dutch oven's surface will begin to turn a deep chocolate color. Once this happens turn the heat off and allow to cool down.
iii) After the dutch oven cools a bit, apply another light layer of oil to the surface and bake in your oven for 1 hour at 450 Fahrenheit.
Got cookware questions? Check out our handy-dandy guide on all things pots and pans. You'll find care tips, details on which materials are best for what, and oh-so much more.
Meet the Maker
Smithey Ironware Co.
A Similar Style
Our Tips & Stories
How we'd use this beauty in our own homes.

Do you use the Hotline? If you haven't been lately, you're missing out -- between discussions about Easter ham and Passover desserts, questions about FOOD52 recipes, and friendly debates about the ins and outs of the kitchen, it's a lively place. Here are our top 5 Hotline questions of the week.

Do you use the Hotline? If you haven't been lately, you're missing out -- between discussions about macarons and caramels, questions about FOOD52 recipes, and inquiries on how to maintain stainless steel cookware, it's a lively place. Here are our top 5 Hotline questions of the week.

Amanda shows us how to season a cast iron pan right.


