Bake

Everything You Need to Know About Pie Crust

We should all have a solid command of the ABCs of baking. Thankfully, Food52's Test Kitchen Manager Erin McDowell -- alongside photographer Sarah Stone, who both blog at The Shutter Oven -- is here, with tips and tricks to help you master the most essential desserts and the simplest breads.

Today: You don't need to fear pie crust any longer. Erin -- Food52's resident pie expert -- is here to help. 

Pie Crust on Food52

Shop the Story

I’ve managed to get myself a little bit of a reputation when it comes to pie -- so much so that I've baked 34 pies in the last 14 days. This reputation started with one simple fact: I love pie, and I am not afraid to sing it from the rooftops. 

While there are plenty of details to consider when making a pie, it is, at its core, one of the simplest desserts ever. My crust has only four ingredients: all-purpose flour, a pinch of salt, butter, and ice water. I like to keep things simple because I often find myself making pies at the last minute. This ratio is easy to remember, and easy to pull off.

The trick is learning to manipulate these four ingredients properly to achieve the perfect (or even just pretty darn good) result. That’s the thing about pie -- even an imperfect one is still amazing.

More: Once you have a handle on your crust, fill it with fresh blueberries.

Of course, you can always experiment with different fats or added flavors (it’s great with rosemary, vanilla sugar, or even flaky salt for a savory pie). But today we’re just talking about the basics, so let’s dig in. 

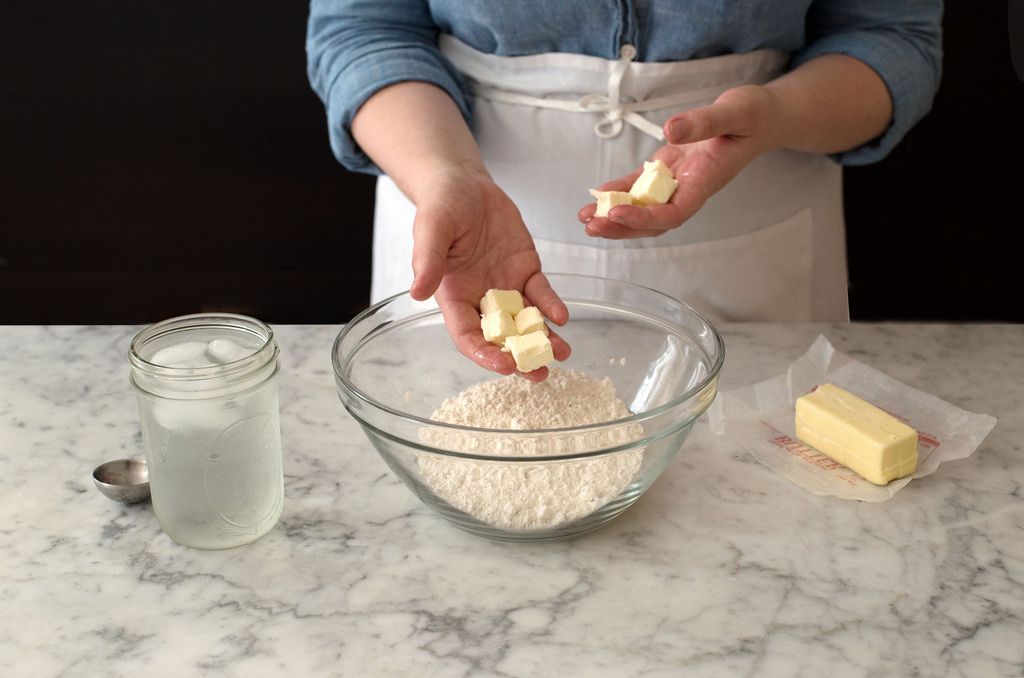
  • Start with cold ingredients. I don’t usually chill my flour, but in the heat of the summer, it can only help. Definitely start with ice water and well-chilled butter, cut into 1/2-inch cubes. I like to chill all of my ingredients in the freezer for 5 to 10 minutes before I get started -- you can even throw in the mixing bowl, too. 

Pie Crust

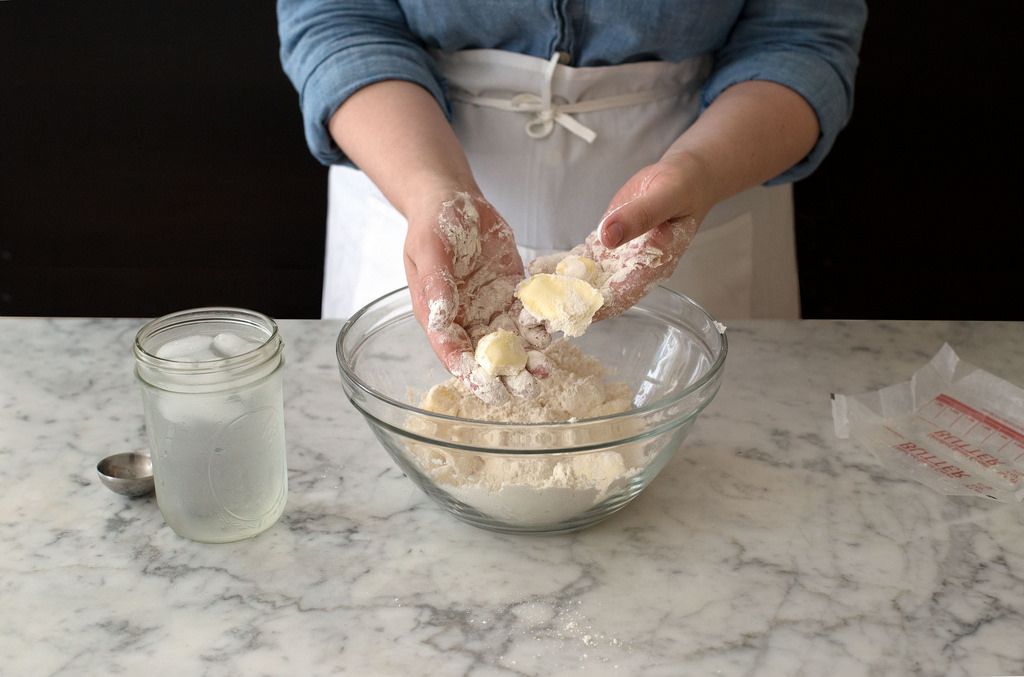
  • Mixing by hand gives you the most control, which makes you less likely to overmix your dough. To do this, toss the cubed butter into the flour to coat each piece. After it’s well coated, begin to “cut in” or “rub in” the flour: Shingle the butter between the heels of your hands, pressing them against the butter in opposite directions. (This melts it less quickly than using your fingers does.) The idea is to flatten the butter into big shards. Continue to toss the butter in with the flour as you work to re-coat the shingled pieces.  

Pie Crust on Food52

  • If you have hot hands (or just a hot kitchen), a food processor works, too. Start by cutting the butter into slightly larger cubes (roughly 3/4-inch). Toss the butter in flour to coat before adding it to the food processor, then pulse in 3-second bursts; I find that 10 to 15 pulses usually do the trick. Once that's done, it’s best to add the water by hand; the food processor blade tends to over-mix pie dough.
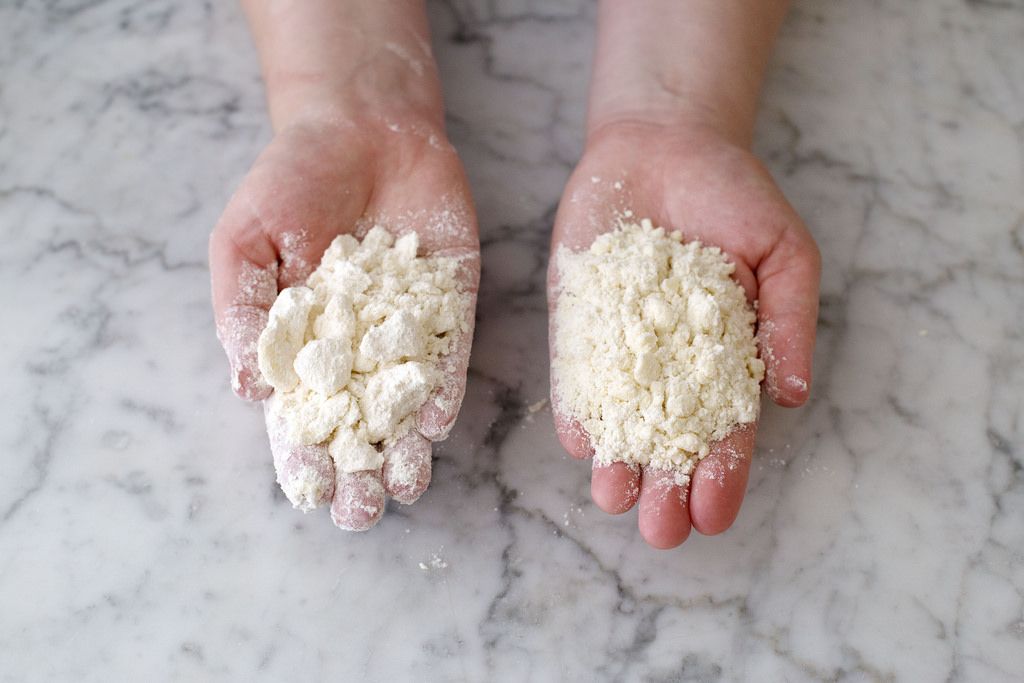
  • The kind of crust you want will depend on the kind of pie you’re making. If you're looking for a flaky crust (best for fruit pies), you want large pieces of butter, the size of walnut halves. If you're looking for a mealy crust with a shorter crumb (best for custard pies), you want small, pea-sized pieces. Here, you can see the mixture that will create a flaky crust (left), and the mixture that will create mealy crust (right). 

Pie Crust

  • When you’re ready to finish your dough, make a well in the center of the flour mixture, and add ice water. I start with 3 tablespoons for a single-crust pie, and then continue adding 1 tablespoon at a time just until the dough comes together. Your dough should never be sticky -- it should hold together easily but still feel almost dry to the touch.
  • When you are done mixing, wrap the dough and chill it well in the refrigerator. If you’re short on time, you can chill it in the freezer for 10 to 20 minutes. If it gets too cold, just let it soften for a moment at room temperature, or beat it with your rolling pin until it becomes malleable.

Pie Crust on Food52

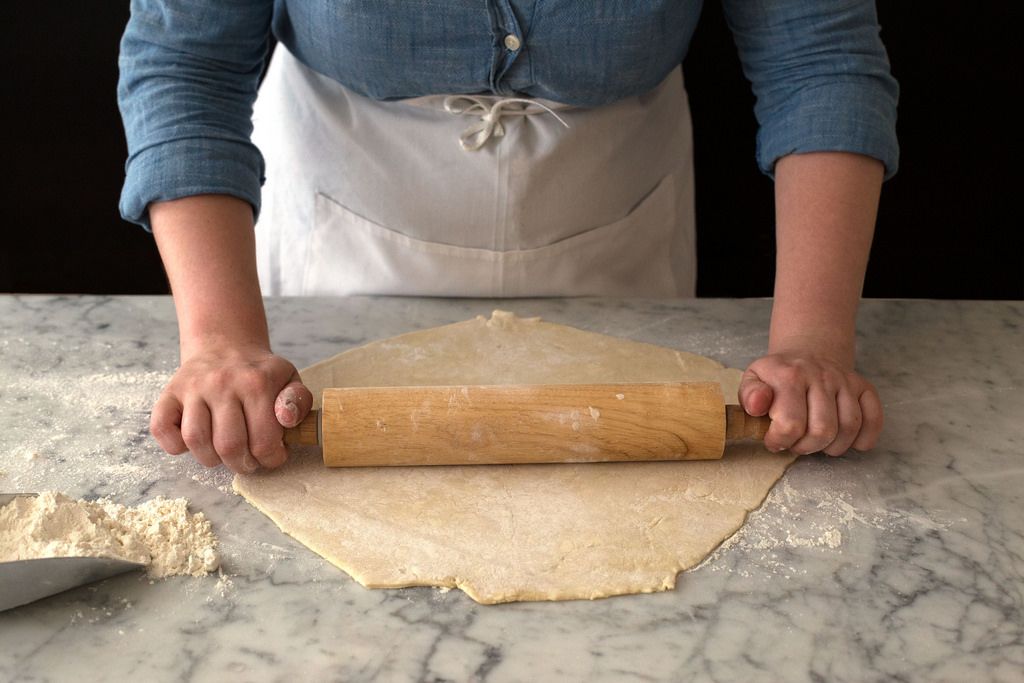
  • Roll out the dough on a lightly floured surface. The key is to work quickly (so the dough doesn’t heat up), using as little flour as possible; using too much can make the dough tough or overly dry. Start rolling in the center of the round and push upward with even pressure. Return to the center and repeat, this time moving downward. Continue to do this while you roll, rotating the dough occasionally and re-flouring as needed to keep it from sticking to the work surface. This technique takes a little getting used to, but it’s the best way to get an even crust. Aim for 1/8-inch thickness.

Pie Crust

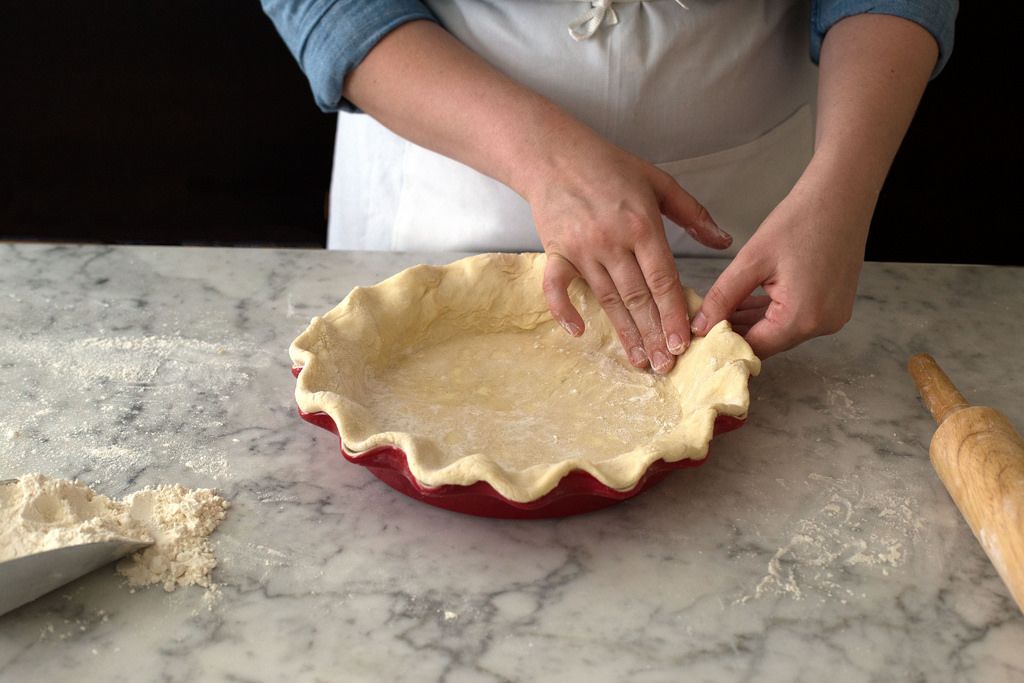
  • To transfer the dough to your pie plate, roll it onto the rolling pin and then gently unfurl it into the plate. Press firmly to make sure the crust reaches all the way to the bottom of the plate, but don’t poke any holes in the dough. Trim the dough so you have a 1/2-inch overhang all the way around, and chill it for 15 to 30 minutes (or freeze it for 5).
  • Tuck the excess dough under at the edges, working all the way around and pressing lightly to help the dough “seal” to the outer edge of the pie plate. Return the dough to the refrigerator for 15 to 30 minutes, or to the freezer for 5 to 10 minutes before proceeding with baking or par-baking. 

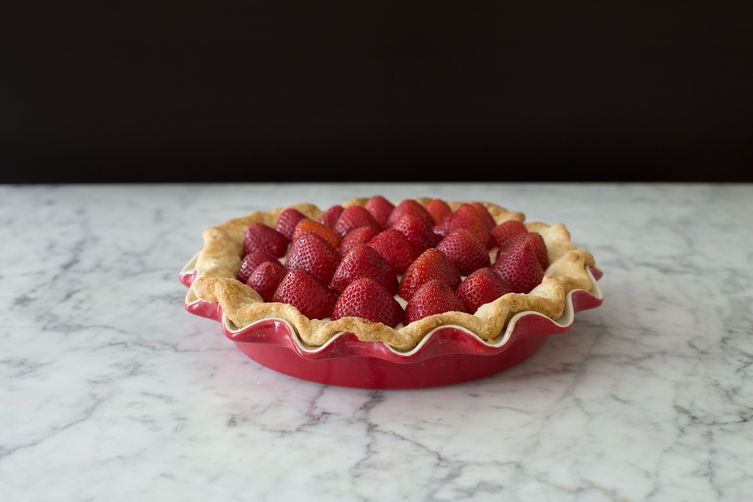
Strawberries and Cream Pie on Food52

This pie plate was a gift from Rose Levy Beranbaum -- she designed it, and it's called “Rose’s Perfect Pie Plate”. It’s pretty, bakes evenly (hello, crisp bottom crust!), and makes a gorgeous edge without any effort at all. I highly recommend it for pie beginners -- anything you bake in it looks professional! 

Strawberries and Cream Pie 

Makes one 9-inch pie

For the crust:

1 1/4 cups all-purpose flour
1/4 teaspoon salt
8 tablespoons (1 stick) cold butter, cubed
3 tablespoons ice water, or more as needed 

To finish the pie:

3 cups whole milk
1/2 cup heavy cream
1 vanilla bean, halved and scraped
1/2 cup granulated sugar
1/3 cup cornstarch
3 eggs
2 tablespoons butter
1 quart strawberries, hulled

See the full recipe (and save and print it) here.

Photos by Sarah Stone

52 Days of Thanksgiving
Check It Out
52 Days of Thanksgiving

Top-notch recipes, expert tips, and all the tools to pull off the year’s most memorable feast.

Check It Out

See what other Food52 readers are saying.

  • Mrs Beryl Patmore
    Mrs Beryl Patmore
  • Marie
    Marie
  • Lisa Todd Willard
    Lisa Todd Willard
  • jenny
    jenny
  • Tatiana Barkovskiy
    Tatiana Barkovskiy
I always have three kinds of hot sauce in my purse. I have a soft spot for making people their favorite dessert, especially if it's wrapped in a pastry crust. My newest cookbook, Savory Baking, came out in Fall of 2022 - is full of recipes to translate a love of baking into recipes for breakfast, dinner, and everything in between!

16 Comments

Mrs B. August 1, 2016
Here's a helpful article on why one should not use the type of pie plate (earthenware) shown in the photo above: http://www.seriouseats.com/2016/08/how-to-choose-the-best-pie-pan.html
 
Marie July 22, 2015
Okay. I'm new at making pie crust but 3 times I've tried your direction and 3 times it's flopped over in the oven. It looks great going in the oven. Not to dry/wet. I'm using cold butter, ice water and following every step of your directions. Pillsbury is looking really good right now. Can somebody please tell me what I'm doing wrong?? I just want to make that darn deep dish cherry pie!!
 
Lisa T. June 5, 2015
Can you please tell me how you measure your flour? Do you dip you measuring cup into a flour bin and level or spoon your flour in the measuring cup and level. I know that this will make a difference also. Thanks for the clarification.
 
jenny October 19, 2014
The step that always gives me trouble is forming the actual ball of dough after all ingredients are mixed. I find it hard to get it to stay together without overmanipulating it or adding too much water. Any tips for that? Thanks!
 
Tatiana B. October 13, 2014
Important!!
Dear Erin, I've been looking for a basic pie recipe for years! My favourite kind of pie is double crusted - can I double your ingredients to make it? Will it go well with fruits baked inside? If so, how long and at what temp should I bake it? Cheers!
 
Diana B. July 6, 2014
Kama and erin, I was talking about par-baking a pie shell, which I see I wasn't clear about (although it might not make a difference), so would you still bake it at 425 if you're par-baking? Thanks!
 
Erin J. July 10, 2014
Hi Diana, yes - I still par-bake at 425. Next Friday I'll be doing Pie Basics Part II, which is all about blind baking. Check back for more!
 
Diana B. July 10, 2014
I can't wait!
 
Dave July 21, 2014
Yes, that's what you do. 425 for 15 minutes.
 
bc July 5, 2014
Unclear instructions. After you freeze or refrigerate you "Tuck the excess dough under at the edges", when the dough is stiff? I think you would get a crack if you did this. Please advise.
 
Erin J. July 6, 2014
Thanks for the comment, BC! The crust should be well chilled, but still malleable. If your crust is too hard to fold under, let it sit at room temperature until still cool to the touch, but soft enough to work with.
 
Diana B. July 5, 2014
In the photo, your crust doesn't seem to have shrunk at all. Despite chilling all the ingredients, despite resting it in the fridge for at least two hours before rolling out, and despite putting it in the freezer for an hour before baking, mine always shrinks, sometimes dramatically. I try to sit the edge above the rim of the pie pan, but sometimes it even shrinks so far down in the pan that it can't contain all the filling. Any clues for me? Thanks!
 
Kama K. July 6, 2014
Use less butter, I had exactly the same problem. My tarts didn't have edges because of shrinking.
 
Erin J. July 6, 2014
Kama is right! Some old fashioned recipes call for a lot more fat than is needed-too much butter will often cause melting rather than steam production through evaporation of the butter. In addition to checking your recipe, it's very important to bake at a high temperature-I start all of my pies at 425! I'll be going into more detail in the next baking basics column (pie part II)!
 
EmFraiche July 4, 2014
What determines whether or not you par-bake your pie crust?
 
Erin J. July 6, 2014
Great question! I'll be addressing that in the next column (pie part Ii)! Check back on Friday the 18th!